Saturday, June 30, 2012

Skinny Pad Thai

by Peg Cochran
Gigi Fitzgerald, the amateur sleuth in my first Gourmet De-Lite book, Allergic to Death, (which debuts in August!) creates gourmet diet meals for her clients.  She believes in eating well and enjoying  food but keeping it on the light side with lots of vegetables and clever substitutions for higher fat items.  I think she would approve of this lighter version of the delicious Pad Thai.


Makes approximately 6 servings
Rice noodles on left

Peanut Sauce
5 ounce can of evaporated milk
1/3 cup smooth peanut butter
2 TBL soy sauce
1 tsp. grated ginger (I love the stuff in jars that's already grated for you)


Pad Thai
8 ounces dried, thin rice noodles (available in most ethnic sections of your local supermarket)
Fresh ground chili paste
1/4 cup water
1/4 cup Splenda or sugar
2 TBL ketchup
1 1/2 TBL soy sauce (I prefer the low sodium kind)
1 lime
1/2 tsp Sambal Oelek or Sriracha (chili paste available in the ethnic section)
2 TBL vegetable or olive oil
2 chicken breasts cut in half horizontally and then into bite-sized pieces
2 garlic cloves, minced or put through a garlic press
1 large egg, beaten
1 can bean sprouts, rinsed
1 bunch green onions, sliced
1/2 cup chopped peanuts

Place ingredients for peanut sauce in blender and blend until smooth.

Soak rice noodles according to package directions.

Combine water, Splenda, ketchup, soy sauce, juice of 1 lime wedge (or squirt of lime juice), and chili paste in small bowl and mix.  Set aside.

Heat oil in skillet and add garlic.  Cook briefly until garlic begins to color slightly.  Add chicken and cook, stirring, until opaque, approximately five minutes.  Stir in noodles and pour ketchup mixture over noodles.  Cook approximately 2 minutes until sauce is absorbed.
Push noodles to side to cook egg

Push noodles to one side of skillet and add beaten egg.  Stir until egg is cooked, then mix into dish.  Add bean sprouts, 1/2 cup green onions and 1/4 cup peanuts.  Stir until mixed.

Place on serving plate and mix with peanut sauce.  Sprinkle remaining green onions and peanuts on top.  Serve with lime wedges for squeezing on top.


Enjoy!  Chopsticks optional!


Friday, June 29, 2012

Peppermint Ice Cream Pie

by Sheila Connolly

Here it is!  The recipe that makes women go all misty-eyed and drool.  The dessert that had us lining up outside our college cafeteria early for the lunch where there might just maybe be some leftovers (usually not).

It's fast.  It's easy.  It's pretty.  And it tastes great!  I was describing it to the check-out woman at the grocery store when I was buying the ingredients and she was ready to make it on the spot.  Yes, it's that good. 

Ingredients:

One crumb crust — you may use vanilla wafers, graham crackers or chocolate wafers.  Most of the recipes on the box offer you the option of chilling it or baking it.  I prefer baking it, because I think it holds together better and stands up to a gooey filling.  But, heck, in you're in a hurry, buy a frozen crust!

Chocolate sauce —  In a pinch you can use anything in a jar or bottle, as long as it's not too runny—you want it to stay in place when you spread the ice cream over it.  I opted for a chocolate ganache recipe:

5 oz. unsweetened or bittersweet chocolate, chopped
¼ cup (1/2 stick) chilled butter, cut into half-inch cubes
1 tsp vanilla extract
¾ cup heavy whipping cream
¾ cup sugar

Place the chopped chocolate, butter and vanilla in a medium bowl.  Bring the cream and sugar to a boil in a medium saucepan, stirring until the sugar dissolves.  Slowly pour the hot cream mixture into the bowl with the chocolate and let stand for a minute, to allow the chocolate and butter to melt.  Then whisk until the mixture is smooth.  Chill until spreadable, about one hour.

When the ganache is chilled but not hard, spread it over the bottom (not the sides) of the crumb crust—you should have a nice thick layer about a quarter inch deep.  Return the pie to the refrigerator and chill until the chocolate layer is fairly solid.

This recipe made more than enough for the pie.  I have some left over.  Not for long!

Peppermint stick ice cream – if you're in New England, it's Brigham's.  The chain was founded nearly a century ago not far from Boston, and at its peak operated a hundred restaurants; now there are only 25 or so.  But the ice cream lives on!  It first appeared in supermarkets in 1983 and is widely available in New England.  The flavors still show a New England bias, with names like Wicked Chocolate and Big Dig (if you don't recognize that, you aren't from around Boston!).

Use one one-quart container of ice cream. Empty the container into a large bowl  and let the ice cream soften until it is spreadable but not liquid. (Moosh it and blend it until it's the right consistency—you should be able to mound it up a bit in the middle.) Spread the ice cream over the hardened ganache.  Place the pie in the freezer until the ice cream is solid again.

Whipped topping — When you're ready to serve the pie, pull it out of the freezer and add topping. if you're feeling indulgent, use whipped cream (the stuff in the can works just fine), otherwise any commercial topping will do.

You can also decorate with the topping of your choice.  Add jimmies (sprinkles to you non-New Englanders) or shaved chocolate if you want, but if you can't wait, just dig in!


Thursday, June 28, 2012

Tamale Pie

Here in Texas, we're enjoying our first wave of genuinely hot weather for the summer.  We've hit triple digits once already this year, but that was for a single day.  This whole week the mercury will top 100.

Contrary to popular belief, Texans don't love the heat.  We don't even handle it especially well.  Rather, when the temps get steamy, we do our best to stay indoors.  Even inside in the air conditioned cool, though, you don't exactly want to cook.

But you do want to EAT.

And therein lies the conundrum:  how to cook hearty, family-friendly meals without slaving over a hot stove.

This simple tamale pie relies primarily on canned goods (the only chopping is a single jalepeno, and you could really leave that out in favor of a dash of ground chipotle or ancho chili powder) and a packaged cornbread mix.  You have to have the stovetop on to simmer the chili and the oven on to bake the pie, but you don't have to hang out with those heat-makers.  Get it started, then retreat to cooler climes.

Best of all, the end result is positively delicious: spicy, sweet, chewy, crispy . . . it hits all the right notes.

I make this using a package of frozen ground burger substitute.  You could probably use a pound of ground beef instead, browning it and draining off the grease.  If you try it, let me know how it goes!

Enjoy.


Tamale Pie
Chili Filling

1 can black beans, drained and rinsed
1 can pinto beans, drained and rinsed
1 lb ground beef, browned and drained OR 1 package faux burger crumbles
2 14 oz cans diced tomatoes w/ juices
1 1/2 c. corn kernals (fresh or frozen)
1 jalepeno pepper
1/2 tsp. garlic powder
1/8 tsp. onion powder
1 tsp. cumin
2-4 Tbs. chili powder
1 tsp. salt (or to taste)

1 1/2 c. shredded cheddar cheese (reduced fat fine)

1 package of cornbread mix for 8 x 8 or 9 x 9 pan, batter prepared according to package instructions

Preheat oven to 375.

Combine all of the chili materials in a large skillet. Heat to a simmer over medium high heat, then reduce heat to medium low and continue cooking for about 30 minutes.  (Note:  I use a full 1/4 c. chili powder, which isn't particularly hot ... start with 2 Tbs. and see if you want more or not.)

Unbaked, with batter on top

Baked to a beautiful golden brown

Spray a 9 x 13 pan with nonstick spray.  Spread chili in pan.  Top with shredded cheese.  Pour cornbread batter on top.  Bake for about 35 minutes, until the cornbread is golden brown and a knife inserted in the topping comes out clean.

Cool for 5 minutes before serving.

Wednesday, June 27, 2012

Say Cheese Meatballs & Gluten-free!

From: Avery Aames


I shared this recipe on one of my dear friend Janet Rudolph's blogs, she has two: DYING FOR CHOCOLATE and MYSTERY FANFARE, but it bears repeating on Mystery Lovers Kitchen. This is one of my husband's and my all-time favorite meals.  It's good in June and in January. The flavors are hearty. The fixings are easy - 9 items.  And it all mashes together. Served with a simple salad, it is divine and delish.

My mother always made spaghetti as I grew up, but she never served just the meatballs. My husband and I were at an Italian restaurant in Los Angeles that boasts "gluten-free" items, so we went. He had these delicious meatballs, and I couldn't have them. They had bread crumbs in them. So I immediately sobbed in my soup. Boo-hoo. Okay, I did not sob. I did have a lovely gluten-free meal. And then I went home and made my own recipe, and the meatballs turned out exactly the same, according to my husband. They're big, about three ounces of meat in each, and moist!!

The cheese...of course the cheese...makes them superb!  Say cheese! 

Enjoy!

Italian Meatballs - Gluten-free


Serves 3-4

Ingredients:

2 pounds ground beef
2 eggs
1/2 cup gluten-free bread crumbs (I use Glutino – you can also mash up gluten-free rice cereal and use that)
2 tablespoons mixed herbs (rosemary, basil, thyme, parsley)
1 yellow onion, sliced thin
1 jar of your favorite pasta sauce (I use Paul Newman's Tomato Basil)
3-5 cloves garlic
6-8 slices fresh Mozzarella
1/2 cup grated Parmesan.

Directions:
Heat the oven to 300 degrees
Mix the beef, eggs, GF bread crumbs, and herbs in a bowl. Roll the mixture into six to eight "large" balls (depending on how many you are serving).
Lay a 15 x 10 cookie sheet or 9 x 13 pan with foil. 
Pour half of the pasta sauce onto the foil. Lay the onions on the sauce. Add the cloves of garlic. 
Place the beef balls on the sauce. Top each with a slice of Mozzarella. Seal the foil.
Bake for 60-90 minutes in a slow oven.

Set out three to four plates. Divide the remaining sauce among them. Place two meatballs in each serving. Sprinkle with Parmesan.


* * *

You can learn more about me, Avery, by clicking this link.
Chat with me on Facebook and Twitter.

And if you haven't done so, sign up for my mailing list
 so you can learn about upcoming events, releases, and contests!

Also, do you know about my alter ego?
DARYL WOOD GERBER...
That is my "second" name on the left.
Daryl is what my husband actually calls me.

Daryl--I--will have a new series out in 2013:
THE COOKBOOK NOOK MYSTERIES
featuring a cookbook store owner
who is an avid reader and admitted foodie!

"Like" Daryl's page on Facebook and "follow" Daryl on Twitter.
She doesn't say all the same things "I" do. Promise.

Say cheese!

***********


Tuesday, June 26, 2012

How to Bake a Fireworks Cake for July 4 + Tips on Frosting Any Cake by Cleo Coyle


Let them eat Flag Cake! That was Mom's motto every July Fourth, and this is my version of her annual Flag Cake. I first posted this recipe last summer, and a few readers requested that I send the recipe via e-mail. Instead, I'm re-posting the recipe--just in time for next week's celebration of Independence Day (here in the USA). Click here for the PDF or scroll down for the recipe.

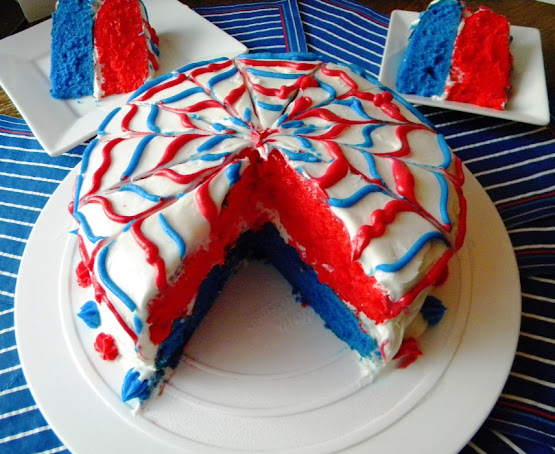
The cake has a wonderful "wow" factor to it (especially after you cut it--see photo below), yet it's incredibly easy to create, practically a klutz-proof design, making it a great project for families with young children. The step-by-step process is photographically illustrated for you below. 

To make the cake itself, you can certainly use your favorite white cake and frosting recipes, but (honestly) I saved time the way so many busy families do. I used a boxed white cake mix and 2 cans of white frosting.

I didn't use a pastry bag, either, just grocery store cake decorating supplies like the ones you see in my photo (right). So let's get started...


To download a free PDF
of my recipe that you can
print, save, or share,
click here.

http://www.coffeehousemystery.com/userfiles/file/FireworksCake_CleoCoyle.pdf
Click here to download this
recipe in a free PDF document.


To make the cake
you will need:


2 eight-inch round cake pans
Parchment paper
Non-stick cooking spray

1 box White Cake Mix (I saw nice results with Pillsbury's Moist Supreme Classic White cake mix, which has pudding in the mix)
1-1/4 cups water (or according to your mix's directions)
1/3 cup oil (or according to your mix's directions)
3 to 4 egg whites (or according to mix directions -- just do not use whole eggs, the yellow in the yolk will muddy up the food coloring)
2 teaspoons liquid food coloring (red and blue)
or 1/2 teaspoon food coloring paste (also called "icing color")
2 (16 ounce) cans of White Frosting (or about 3 cups of homemade white frosting, be sure to use clear vanilla extract for a pure white frosting look)

METHOD:

Step 1 - Prep oven and pans: Pre-heat your oven to 350 degrees F. (or according to your own recipe or cake mix directions). Line two 8-inch round cake pans with parchment paper and lightly spray the paper with non-stick cooking spray. (If your baking pans are non-stick, just spray the paper. If your pans are not non-stick, lightly spray the sides of the pans, as well.)

Step 2 - Color your Batter: Make your cake batter according to package directions or your own recipe, with these notes.

(a) Use egg whites only and not whole eggs. Yellow egg yolks will muddy up your cake color. And...

(b) Cake mix directions will tell you to beat the batter for 2 minutes. (You are whipping air into the batter and this is an important step, but you don't want to over-beat, either, so...) Instead, beat the batter for only 1 minute. Then stop the mixer. You should have about 3-1/2 to 4 cups of batter. Divide the batter evenly into two bowls. Add red food coloring (or paste) to one bowl and blue to the other. NOW beat the batter for your 2nd minute. The color should blend in nicely.


Step 3 - Bake your cake: Simply bake according to package directions or your favorite recipe.


Step 4 - Cool and prep for frosting:
Allow the cake to cool completely then run a knife along the outside edge of the pan, place a flat plate over the pan, and flip. The cake should come right out. If the parchment paper is still stuck to the cake, carefully peel it off. P
lace the blue layer top side down, flat side up onto your cake plate, cardboard, or serving platter. (A few dabs of icing on the plate first is a good trick to help it stick.)


Generously slather white icing onto the blue layer. This will (of course) give you the "white" layer between your red and blue cake layers.
Stack the red layer on top. Here's how: Using a sharp knife, carefully level off the top of the red layer. Then flip it and place it on the iced blue layer. You want the flat bottom of the red layer to serve as the very top of your cake. This will give you a perfectly flat surface to create your fireworks design.  


ICE, ICE, BABY! 3 Tips on Icing Cakes

If you're an old pro at this, you already know these standard pointers. I mentioned them last summer, too. For those of you who didn't see them, these tips will help you get great results.

These 2 cake layers have
been crumb coated.
Tip #1: Never Frost a Warm Cake: Be sure that your cake is completely cool before frosting. If you apply icing to a warm cake, the icing will begin to break down, and you'll get a gloppy mess.
 
Tip #2: Crumb Coat and Chill: You should always frost a cake in two stages. The first stage is called the crumb coating. This is a very thin layer of frosting. It's so thin that you should be able to see the cake through the layer. This will create a smooth base for the final coating of frosting. NOTE: You must chill the cake to set this coating properly (1 or 2 hours in the refrigerator). To speed up the process, I place mine in the freezer for 15 to 20 minutes. The remove the cake and do the final frosting. You'll be amazed at how easy it is to get smooth, pro results.

Offset (aka Angled)
Spatula
Tip #3: Use an Offset Spatula (also called an Angled Spatula): If you've been applying frosting with the back of a big spoon or a butter knife, consider the offset spatula (see my picture right). This single tool ($5 - $10) will make it possible for you to smooth the sides and tops of your cakes like a pro.

You can find these at Michael's stores (in their cake decorating section) or most stores that sell kitchen tools. Click here for an online buy link.


CAKE DESIGN:
CREATING THE FIREWORKS

Cleo Coyle is author
of The Coffeehouse Mysteries
The inspiration for this "fireworks" cake design came out of my research for my Coffeehouse mystery novels. Baristas use this method to create latte art. To see a video example click here and watch for this design near the middle of the 3 minute YouTube film.

Of course, pastry chefs also use this method, calling it a spiderweb pattern...


B
egin with a simple dot
in the center of the cake.

I'm not using anything fancy or pro, just the "drawing tip" of a Betty Crocker "Cake Icing" can.


Draw concentric circles around the dot with alternating colors of red and blue. The last circle should be just off the top of the cake, around the side. This allows you to extend the design down the side of the cake.


As you can see, my circles are far from perfect, but the final result will still look great. You've got to love a kid- and klutz-proof cake design!


Next you'll need a wooden skewer, a toothpick, or the edge of a knife. (When using the knife, do not cut into the cake. Simply drag it lightly through the icing.) Drag the tool from the center dot to the outside of the cake. Clean the tool between each drag. Do this four times, making a simple cross...


Be sure to drag the tool all the way over the top edge of the cake to include the circle you made on the side...


Repeat this process 4 more times, bisecting each quarter of the cross you made. (You will now see 8 "slices" of cake in the design.)


Now REVERSE the dragging direction.
Instead of dragging the tool from the center to outside
of the cake, start at the outside and drag your tool to the
center of the cake. Be sure to clean your tool between each drag.


Using the reverse drag, you are now bisecting
each of the original 8 cake "slices" that you made above.


Now clean up the edge of the cake plate,
wiping off excess frosting. Use the "star tip" to
pretty up the base of the cake, and...


Eat (and read) with joy!


New York Times bestselling author
of The Coffeehouse Mysteries and
Haunted Bookshop Mysteries


Cleo (Alice) with her husband Marc

Visit Cleo's online coffeehouse here.
And follow her at these links...


Our 20th 

Coffeehouse Mystery!

Bulletproof Barista

Pre-order now at:


Bulletproof Barista
includes a killer menu
 of delicious recipes!


Coming Soon

New Paperback Edition!


Includes a mini guide
to honey varieties
and a wonderful menu
of delicious recipes...


Click here or on the image above
for Cleo Coyle's Free Illustrated
Recipe Guide to Honey Roasted


Don't Miss Our New
Haunted Bookshop
Mystery...


Jack & Pen 
Together Again!


"AMAZING AND UNIQUE" 

~ Fresh Fiction


"DELIGHTFUL" ~ Kirkus Reviews


To Buy:

Amazon

Bookshop.org

Barnes & Noble

+ Many More Buy Links


The Coffeehouse Mysteries are bestselling works
of amateur sleuth fiction set in a landmark 
Greenwich Village coffeehouse, and each of the 
20 titles includes the added bonus of recipes.  


Get a free Title Checklist of
Cleo Coyle's Books in Order
Click here 
or on the image below.

👇


Cleo is now working on her 
next book and 
Newsletter!


Don't miss her book news, 
bonus recipes, and fun 

prize package giveaways!

TO SIGN UP...


To download a free PDF
of my recipe that you can
print, save, or share, click here.

http://www.coffeehousemystery.com/userfiles/file/FireworksCake_CleoCoyle.pdf
Click here to download this
recipe in a free PDF document.