Saturday, April 30, 2011

An easy breezy brunch for any weather!


I had been wanting to invite our friends Sue and George over for quite a while and soon they’ll be departing for their cottage for most of the summer. I was wondering about what to do that would be easy when I was so busy getting ready for a book tour, Malice Domestic and Festival of Mystery. Sue and George are fun and relaxed so I decided on a simple brunch. By some miracle after trying Cleo's fabulous recipes, I still had a half-cup of maple syrup left, from a sugar bush here in the middle of Canada’s capital. And I had an idea: Maple syrup French toast. As the maple leaf appears on our Canadian flag, it's downright patriotic.

I thought if we softened up Sue and George with mimosas and some easy advance nibblies, then served the French toast with a bit of maple-glazed bacon and fruit, that would do the trick. It’s all very easy, so we could relax too.

As you can see, Sue likes the mimosas!

I decided to follow it with an easy lemon mousse with served with a few berries and a chocolate cookies. What a nice way to welcome spring weather!

Unfortunately, the day was freezing and blustery with hail and winds and rain. At midday we turned on every light in the living area and hoped the power didn’t go out. The upside was that this brunch, which would be nice and sunny even served outside, was warm and comforting in the bad weather. My DH squeezed large juicy oranges and popped a bottle of Prosecco, a dry Italian sparkling wine. We like it more than champagne and that’s good because it’s not expensive.

Here is the recipe for Maple French Toast and I have to say it was absolutely delicious.

3 eggs

½ cup maple syrup

½ cup 5 % cream (or milk or heavy cream – suit yourself!)

½ tsp real vanilla

6 slices of bread


I used homemade, but any white bread is fine, especially egg bread or rustic – my attempt with whole wheat bread was not so successful in this recipe.

2 tbsp butter

Beat the eggs, maple syrup, cream, vanilla and salt in a bowl.

Arrange the bread in a baking dish or lasagne dish.

Pour the mixture over it. You can make it the night before and it will be perfect for breakfast. The bread will soak up all the liquid. Yum. Make sure you let it rest at least an hour.

Melt butter in a heavy pan with even heat or use a griddle. Keep it to medium heat. Fry slices for about two minutes on each side. They should be golden. We ate ours with bacon drizzled with maple syrup and pepper and baked. Some people had extra maple syrup for the vitamins.

I didn't include the bacon recipe, because it still needs experimentation to get a nice rich color. Stay tuned.


Mimosas (my kind of recipe – two ingredients)

Some fresh orange juice

Some Procecco or your favourite sparkling wine or sparkling water (chilled)

Pour into glasses and serve.

Lemon Mousse

Ingredients

1 ¼ cup whipping cream

1 lemon juiced and zested

½ fine sugar or regular sugar put through the food processor

2 egg whites

Put the cream, lemon zest and sugar into a large bowl and whisk them together until the mixture starts to thicken. Add the lemon juice and whisk again until the mixture thickens further, don't let it get too stiff or you won't be able fold in the egg whites.

Beat the egg whites until they form soft peaks and then fold them into the lemon mixture. Spoon the mousse into 4 glasses and chill. Decorate with extra zest if you like, or berries and small cookies.

We think we’ll make this brunch a tradition! With a griddle, we can whip up enough for a crowd easily.

I've decided to offer all these recipes to Charlotte Adams, currently run off her feet in The Busy Woman's Guide to Murder. After all, she's offered us a lot of time saving tips and that's only fair.


The Busy Woman’s Guide to Murder: a Charlotte Adams mystery (April 5, 2011)
A TOP PICK! RT Book Reviews, 4 1/2 stars

“Devotees of the classic mystery can do no better than this clever twister.” The Globe and Mail.

Friday, April 29, 2011

Step Away from the Microwave!

Just a quick, fun post today!

I sure hope my family is eating healthy while I'm out of town. I know that whenever I'm gone, they feast on all those snacky foods that aren't good for them. My kids are all adults now, and know better (and my husband has been an adult for even longer) but that doesn't mean they always make the best food choices.

Truth be told, neither do I.

But, let's talk about one of America's favorite snacks: Popcorn. It sells by the bucketful at movie theaters and people make it at home every day.

We love popcorn here. Tasty, full of fiber, perfect watching TV food, right?

Here's a question for you. Do you use microwave popcorn or do you make your own?

If you're like most people, you rely on microwave popcorn to satisfy that salty, buttery craving. For years people didn't think twice about popping a bag in, zapping it, and enjoying a bowl within minutes. Well... now we're hearing claims that microwave popcorn chemicals may be hazardous to our health. (What *isn't* nowadays?)

I can't say whether those claims are true or bogus. But I can tell you that homemade popcorn isn't just superior... it's *FAR* superior to any microwave popcorn I've ever tried.

Best of all, it's inexpensive, and easy.

Here's what you need:

Popcorn oil
Popcorn
Popcorn salt

It helps to have an old aluminum pot. The more beat up, the better. And if you can get one like this that has a lid that clamps down, all the better. I took this one from my mom when I first got married. She didn't mind. I'd always been the one who popped popcorn at home and my mom had always nagged me to remember to wash it when I was done. I never remembered to do so. And now my kids don't remember to wash it, either. What goes around...

Anyway, although you can buy a fancy one at Williams-Sonoma I've seen pots like these at estate sales and antique stores for less than a couple of dollars. I like to keep mine for popcorn only. I think it keeps the taste pure.

Let me add one small tidbit: My sincere thanks to TV Time popcorn for inspiring me. I used to buy their brand all the time. Best popcorn ever. But when microwave versions took over, TV Time disappeared. Now I use their "recipe" to make my own.

Here goes:

Add enough popcorn oil to cover the bottom of your pot. Add about a teaspoon of popcorn salt at this time. Yes, before you pop. You'll know after your first batch whether you need to use more or less in future batches. These days I just eyeball it.

Add about a handful of popcorn. It should almost, but not quite, cover the bottom of the pan.

Turn heat to high, cover pot, and wait. When the first kernal pops, turn the heat off but leave the pot there. Wait one minute.

Turn heat back on to high. When you next hear a kernal pop, lift pot off the burner and begin to move it around, shaking it thoroughly to keep kernels at the bottom. Keep the pan somewhat near the burner. If you lift too high you won't get enough heat.

When the popping slows, but before it stops, remove from heat (place it on another, cool, burner) and when popping stops, remove lid. Pour into bowl and you're good to go.

You don't want to overpop (burn) the popcorn, so that's why you remove it from the heat before it finishes.

That's it. Easy, good for you, and much, much better tasting than the microwave stuff.


Happy Popping!

Julie


Thursday, April 28, 2011

SAY CHEESE, AGAIN...in one week


I'm traveling this week.

There's a big conference near Washington D.C. called Malice Domestic.

Tons of mystery authors and fans gather.


There are panels, special presentations, awards. It's a bunch of fun. But it makes for a short week to prepare food. Especially coming on the heels of a vacation week.


Add to that a book launch ONE WEEK FROM TODAY -- yep, one week -- LOST AND FONDUE comes out. Needless to say, I'm a little hyper. [Marketing, traveling, more marketing. Oh, yes, and writing book 4 in the series...]


(A hamster on a wheel has nothing on me! Whoa, am I spinning backwards? LOL)


So I decided to make something easy and light over the weekend. It's an appetizer that is so sweetly delicious yet tart that you can pop a dozen in your mouth over a period of an hour. Try...I dare you...try not to.

I've waxed poetic about the beauty of appetizers before. I love them. Done right, with enough selection, and you can make a meal out of them.

So here's this week's quickie. And I'll add a few links below for others. Make a meal. Make two.
And as we head forward into spring.

DATE AND GOAT CHEESE APPETIZER

Ingredients:

{Per person}

3 pitted dates

1 ounce goat cheese

1 sprig basil

1 teaspoon balsamic vinegar

1 dash nutmeg


Directions:

Slice dates in half. Fill each with 1/3 of the goat cheese. Set on a plate drizzled with balsamic vinegar. Set a sprig of basil in the center and sprinkle with nutmeg.


Simple and delicious!

OTHER APPETIZERS [click on the links]:

Fig & Pancetta & Goat Cheese [pictured on right]


Enjoy.

*****

And just in case you want to order the second in A Cheese Shop Mystery series, click here: LOST AND FONDUE

If you'd like to read the first chapter, click here: SNEAK PEAK

And for a lark, if you'd like to see the book trailer, click here: BOOK TRAILER


Wednesday, April 27, 2011

Got Leftover Ham? Ham Casserole!

RileyAdamsFoodBlogPostpic_thumb_thumb[3]Cleo’s delicious ideas for ham leftovers yesterday (Easter egg and bacon salad, ham salad, and Italian Easter Pie Palmiers) really got me thinking (and made me hungry!)

I have a lot of leftover ham. Actually, I’m not sure what possessed me to buy so much ham for Easter since it was just the four of us this year.

So I not only have enough for all of Cleo’s wonderful recipes, but I also have enough for the 2 cups of chopped ham needed for my ham casserole recipe! And the recipes are all different enough that I don’t even think anyone in my house will be saying, “Ham again?”

This recipe is super easy to throw together but you do need to set aside an hour and 20 minutes to cook it since the pasta isn’t cooked when you prepare the dish. So it takes maybe 5 or 6 minutes to throw together, but it’ll take a lot longer to let it cook.

IMG_20110426_161336

Ham Casserole

Printer-friendly version

1 cup milk
1 cup sour cream (I use light)
1 cup water
1 can cream of mushroom soup (I use light)
1 t salt
1 t pepper
10 oz. package frozen peas
2 cups uncooked elbow macaroni pasta
2 cups cooked, chopped ham
3 oz. can sliced mushrooms (drained)
1 cup (4 oz.) shredded Swiss cheese

Preheat oven to 350 degrees. Combine sour cream, milk, water, salt and pepper with the mushroom soup. Add frozen peas, uncooked pasta, ham, and mushrooms. Spray a 13-x-9 inch baking dish with cooking spray and spoon mixture into dish. Sprinkle shredded cheese on the top.

Cover the casserole and bake for 80 minutes. Uncover and cook for 10 more minutes.

IMG_20110426_161413

Hope everyone had a Happy Easter!

Riley/Elizabeth
Delicious and Suspicious (July 6 2010) Riley Adams
Pretty is as Pretty Dies –Elizabeth Spann Craig

Tuesday, April 26, 2011

Easter Egg Salad and More Tasty Ideas for Your Holiday Leftovers from Cleo Coyle


Easter eggs are so very pretty.
Bright with spring colors,
they're fun to dye
and equally fun to photograph.


They're also delicious to eat. Will you be eating your Easter eggs? How? With a dash of salt or Tabasco? Or (ironically) as deviled eggs?

Here's how my husband
and I like to eat them:


Cleo Coyle, who always
appreciates a good egg, is author
of The Coffeehouse Mysteries


Cleo Coyle's
Easter Egg
and Bacon Salad
To download a PDF of
this recipe that you can print,
save, or share, click here.


Makes 4 servings


INGREDIENTS:

8 hard boiled eggs
4 slices bacon
2 teaspoon fresh parsley, chopped
1/3 cup mayonnaise
pepper to taste (optional)
1 teaspoon lemon juice 
   or white vinegar (optional)


DIRECTIONS: Peel the hard boiled eggs and chop them into a bowl. Set aside. Place a small skillet over medium heat. Using kitchen shears, cut the bacon into slivers, fry them up in the skillet, and drain them on paper towels. Toss the bacon bits into the bowl with the chopped eggs. Add the fresh, chopped parsley, and mayonnaise. Because the bacon is salty, I never add salt to this salad. A bit of pepper is a nice addition. I sometimes add 1 teaspoon of lemon juice or white vinegar. This brings a slight bright tanginess to the salad that you might like, as well.


Would you like a few more leftover ideas?
Click the links below for some
of my past recipes . . .  


Do you have extra potatoes and carrots on hand? My Autumn Potatoes are a healthier version of garlic mashed potatoes. The addition of carrots (and the use of very little butter) make it a tasty recipe with more nutrition and fiber than regular mashed potatoes. They're prettier on your plate, too. But the best part is this: The creamy, buttery potatoes are still the star of this side dish. You hardly taste the carrots.

Click here for the PDF of this recipe.


Is your fridge still full of holiday ham? Here are two ideas. Above is a classic ham salad recipe. Try it on crackers with an olive or slice of jalapeno. Click here for a PDF of my Ham Salad recipe.

Below is a picture of my Italian Easter Pie Palmiers, a very easy appetizer made with frozen puff pastry, a few other ingredients, and your leftover ham. The recipe is based on the flavors in my late aunt Mary's annual Easter pie. Click here for a PDF of my palmiers recipe.


Finally, if you happen to have extra turkey or chicken in the house, try my quick and easy pot pie with cheddar cheese crust. For a PDF of one of my favorite post-holiday leftover meals, click here.


Do you have a favorite
idea for leftovers?

Let us know in the
comments below, and . . .

Eat with joy!

~ Cleo Coyle, author of
The Coffeehouse Mysteries


To get more of my recipes, win free coffee,
or find out more about my books, visit me
 at my *virtual* coffeehouse:

 
Click on the book covers above
to learn more about Cleo's culinary mysteries.


Monday, April 25, 2011

Gambas al Ajillo with Pasta


Many years ago, I studied in Spain. My Spanish is still terrible, but it was a wonderful time for me. As students on a budget, we ate a lot of our meals in Spanish bars.

Unlike American bars, they were family-friendly places where locals went for that second cup of coffee in the morning or a quick lunch. And since dinner was served late, the bars did most of their business in the late afternoon when they served tapas -- small dishes of appetizers.

One of my favorite tapas was Gambas al Ajillo (garlic shrimp). Typically served in a shallow earthenware bowl, it's basically shrimp cooked in garlic-infused oil. But there's quite a bit of oil, in fact, the shrimp is swimming in it. It's most often served with bread, but I make my own version and eat it with pasta.

This is one of my quick go-to recipes. It doesn't require a lot of ingredients or measuring and it's a little bit on the comfort food side of things.

The ingredients are simple. I have read recipes for Gambas al Ajillo in which they use lemon, sherry, hot pepper flakes (note, this is not typically a spicy hot dish), paprika, butter, and a host of other things. I imagine that it varies depending on the region of Spain and probably the snazziness of the restaurant, but for the most part, what I have eaten didn't have all those other ingredients. It was pretty basic. I have made it with lemon, which is fine, but we prefer it without lemon.

I have to say that this isn't a light dish. It will probably appeal most to people who sometimes indulge in pasta with no sauce other than butter and salt. Aw, come on. Admit it. I know some of you have eaten that!

It can be made with any kind of pasta, though I prefer spaghetti or linguine.

Gambas al Ajillo with Pasta

1/2 cup olive oil
4 - 6 cloves garlic
1 pound of shrimp
salt (to taste)
juice of 1 lemon (optional)
3/4 pound pasta


Cook the pasta according to the directions on the package.


Mince the garlic and add to the olive oil in a pan over low heat. This is crucial. Garlic burns very easily. Over a very low heat, it will infuse the oil with flavor. You'll notice the scent wafting up to you in a few minutes.


Add the shrimp. In this photo, I used some bits of red and yellow pepper, mostly because I had them around. The shrimp should only take 3 minutes or so to cook. When they turn color and lose that translucent look, they're done. Add salt.

Using tongs or a pasta spoon, drop some of the pasta into the shrimp and garlic mixture. It's okay if some of the pasta water gets into it. Mix and add more pasta until it looks like the right ratio of pasta to shrimp.

Serve and enjoy!


Sunday, April 24, 2011

The Recipe Box


My apologies to BB Haywood and all our readers. With the excitement of Easter, I forgot to post her guest blog. With no further ado -- here's BB!


Happy Easter! A wonderful holiday for baking! Baking is one of the joys in my life. I have been baking ever since I can remember. My mother taught me how to bake, with me standing on a chair by the kitchen counter,a giant wooden spoon in hand. It was the family recipes that were important to learn how to bake so that they could be passed down. Many years later when I was packing for college my mother gave me a recipe box with all of the family recipes in it. I have the recipes sorted by season. The summer recipes first~peach custard, lemon squares, 4th of July brownies. Summer turns to Fall with apple crisp, and chocolate chip pumpkin bread. Then come the Christmas cookies~too many delicious cookies to list. Then my favorite time of the year, Springtime. Lemon pecan cookies, lemon shortbread, hot cross buns. Nice, light delicacies.

Yesterday I baked Lemon Pecan cookies so I will share the recipe with you.

Happy Spring!!


Lemon Pecan Cookies

3/4 cup butter, softened
1/2 cup chopped pecans
1 Tbsp grated lemon rind
1 tsp vanilla
1 cup sugar
1 egg
2 cups flour

1. In a bowl, cream the butter, pecans, lemon rind and vanilla.
Add sugar, egg, flour, and beat until blended.

2. Divide the dough in half. Shape each half into rolls. Wrap them in wax paper and refrigerate several hours.

3. Preheat oven to 400 degrees.

4. Slice dough into 1/4 inch thick cookies. Place them on a lightly greased cookie sheet.

5. Bake 7-10 minutes or until lightly browned around the edges.
Remove from pan and cool.

They are a bit addicting , like potato chips!!
Enjoy~~


Beth Feeman is one half the writing team of the Candy Holliday Murder Mysteries written under the pseudonym of B.B.Haywood.

The books are Town in a Blueberry Jam, and Town in a Lobster Stew. They are set in the fictional town of Cape Willington, Maine.

Beth lives in Maine and loves Springtime~

Saturday, April 23, 2011

IRISH STEW

by Sheila Connolly

We’re celebrating Easter Week here at Mystery Lovers Kitchen, and I realized that my family had few if any food traditions for the holiday.  We always dyed eggs, and my grandmother would arrive from New York with bags full of exotic candy for baskets.  Among these were little rabbits dipped halfway in dark chocolate.  I adored them, and luckily for me no one told me they were made of marzipan, which is made of almonds—because if I’d known there were nuts involved I would have said, “oh, ick”, and refused to eat them.  (I still have reservations about peanut butter, but that’s because I ate a peanut butter sandwich every day during my freshman year in high school—and it was not a particularly happy year.)


My father was born to Irish parents, so I grew up eating lamb.  My husband, raised in the Midwest with lots of beef, has never warmed up to lamb, so I’ve been known to indulge myself in lamb chops when he’s out of town.  But he is fond of a lamb stew recipe that I’ve been making for decades.  I found it in a British cookbook which dates to 1974, but of course I’ve changed it over time. The recipe is very forgiving in terms of proportions—sometimes lamb chunks are hard to find (including in my town, which according to census records has a population of which 25% have Irish ancestry).  And the Easter tie-in is that the new lambs are ready for market at this time.


Let me add that there is no one kind of Irish stew in Ireland.  Some include carrots or cabbage, others add Guinness.  Those aren’t bad (although in the hands of some cooks you end up with a watery mess of overcooked veggies and tough lamb chunks), but to my mind this is the classic recipe, with nothing more than lamb, potatoes and onions.  It’s simple to make, if you don’t mind slicing (which is very easy with a Cuisinart and slicing blade), and you do have to allow time for it to cook in a medium oven—at least an hour, and an hour and a half is better.


This was the last dish we made in our cottage in Ireland last month (believe me, I know this recipe by heart), and I’ve made it since my return, since I can do it sitting down nursing my bum ankle (on the way to recover!).


CLASSIC IRISH STEW

3 lbs. stewing lamb (you can use less)
6 large potatoes (not baking potatoes, which are too soft)
2 yellow onions
2 Tblsp. finely chopped parsley
1 tsp. thyme (fresh if you have it)
1 tsp. salt
Freshly ground black pepper
2-3 cups chicken broth
1 1/2 Tblsp. butter, softened
1 Tblsp. flour


Preheat the oven to 350 degrees.

Cut the lamb into cubes. If you buy it cubed, trim off the fat and chewy stuff (which my daughter calls “squidgely bits”).  Peel the potatoes (oh, heck, you can skip that step—a little potato skin never hurt anyone) and onions and cut them into slices.  A Cuisinart is great for this part, but use a thicker blade (4mm), because otherwise the sliced potatoes and onions will be reduced to mush before the lamb is tender).


Mix the parsley and thyme together (you can also chop all this together in the Cuisinart).  Butter a casserole with a lid, or use cooking spray.


Arrange a layer of 1/3 of the potatoes on the bottom of the casserole.  Cover with a layer of lamb, then a layer of onions.  Season with the herbs, salt and pepper.  Repeat to form 3 layers, seasoning between each layer and ending with the onions.  Add the broth (add enough so that the contents of the casserole are nearly covered but not submerged—the contents will shrink a bit while cooking).


Cover the casserole and cook in a 350 degree oven for 1 1/2 hours until the lamb is tender.


Combine the butter and flour in a small bowl and evenly distribute dollops of the paste to the casserole.  Cover again and ontinue cooking 5 minutes until the juices are thickened.

If you have any left over, this is even better the second day.

Friday, April 22, 2011

Lemon Cookies for Easter


What's more springlike than lemon cookies? Light, fluffy, delicious, and they look so pretty on the table!

I was planning to post a simple lemon cookie recipe here, but... if you've been reading this blog for very long, you know I like to experiment. So I did.

Let me give you the end of this story first:

I decided to look online for a different lemon cookie recipe because I'd heard about one that's been around for years using cake mix and Cool Whip. A quick scan on the Internet and I'd found at least a dozen posts claiming that these cookies were the best lemon cookies ever.

Umm.... not so much.

Let me take you through the process:

I made two batches of cookies. One with my original recipe, one with the Cool Whip version. Maybe it was me. Maybe I made some huge mistake. Maybe I didn't let them cook long enough. Whatever the problem, the Cool Whip recipe did not work for me.

Here's the recipe to follow (color commentary appears below):

Original Lemon Cookie recipe

1 package of lemon cake mix

1 tsp lemon extract

2 eggs

1/3 cup vegetable oil

Powdered sugar

Preheat oven to 350 degrees.

Pour cake mix into large bowl. Add oil. Beat eggs slightly and add lemon extract before adding eggs to bowl. Mix thoroughly.

Roll dough into quarter-sized balls and then roll these in powdered sugar. Place on parchment paper.

Bake for 8 – 9 minutes, but remove from oven before they turn brown.


And here's the link to a printable version of the original lemon cookie recipe.

The Cool Whip recipe sounded deceptively simple. And you know what they say about "if it sounds too good to be true..." right?


Here's what the batter looked like --->

There was no way to form this glop into little balls, so I wound up using the two-teaspoon method of dropping batter into powdered sugar.

But wait, it gets worse!

Among the many helpful hints I found online was one that suggested rolling the balls (ha! blobs is more like it) into Kool-Aid. Not straight Kool-Aid (and Wyler's), but mixed with powdered sugar. Several people claimed it not only made the cookies pretty (ooh all the different colors) but added a little zing of flavor.


A zing?
Color?
You know me. I like to play with my food. This option was a no-brainer (as it turned out, in more ways than one)
<--- I came up with these options.

Oh the joy. I couldn't wait to sample the promised delicious, light, and airy lemon cookies with a hint of black cherry, blue berry, and extra lemon...

Ummm.... remember when I said "not so much"?


These look pretty, but yikes. They were *bad* - like bad, bad. Gooey and flat. The consistency of chewing gum rather than cookies. I'm sure I did something wrong. And those extra flavors? That promised zing? More like a ZOING!!!! I thought my husband's mouth would pucker permanently after he sampled the first one.

For the record, the original recipe cookies came out fine. Fluffy. Crisp outside, soft inside. I tried the flavor/color option with these as well. Not so bad. Probably because there's more cookie substance to cut the zing. But in the future I'll stick with the original recipe, thank you very much.

Hope you have a wonderful weekend!

The next time I see you, I may not be here. I'm leaving the family to their own cooking for a few days while I attend Malice Domestic (where 3 of our contributers here at Mystery Lovers' Kitchen are up for an Agatha Award! Go Avery, MJ, and Sheila!) and participate in the Festival of Mystery in Oakmont, PA. If you're anywhere near the festival I hope you stop by to say hello to Avery, MJ, Sheila, Wendy, and me! (Did I forget anyone??)

Best always
Julie
Don't forget, GRACE INTERRUPTED comes out June 7th!

Thursday, April 21, 2011

Easter or Anytime Dessert


Easter...Spring.

Both bring new life.

Nothing says spring to me like strawberries.

A bowl of berries served fresh at breakfast.

Or a strawberry shortcake, served "fresh" at the end of a luscious Easter meal.

Hmmm, let's go for the dessert in this blog post, okay?

There's nothing like a light but gorgeous dessert.


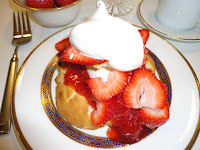
Here's a gluten-free Strawberry Shortcake, that I made using Bisquick Gluten-free baking mix. Now, I know I've spoke about other mixes, like Pamela's, which are also terrific. Use the mix that you feel best with. This Bisquick worked like a dream.

[For those of you who do not need to eat gluten-free, you can use a regular baking mix and make the biscuits according to direction.
If your mix doesn't ask for sugar, add some. It makes all the difference.]

Strawberry Shortcake ala Avery

Ingredients:

2 1/3 cup Bisquick Baking Mix GLUTEN-FREE

¼ cup sugar

1/3 cup butter or margarine

¾ cup milk

3 eggs, beaten

½ teaspoon gluten-free vanilla

¾ cup whipping cream *

Directions:

Heat oven to 425 degrees.

In medium bowl, mix Bisquick mix and ¼ cup sugar. Cut in butter with a fork. Stir in milk, eggs and vanilla. Drop six spoonfuls onto a greased cookie sheet.

Bake 10-12 minutes. They should be a light golden brown. Cool five to ten minutes. With a serrated knife, split the biscuits in half.

On the bottom half, put strawberry sauce, a dollop of mascarpone cheese, and fresh strawberries. Put on the top of the biscuit and drizzle with strawberry sauce. Add strawberries and a generous heaping of whipped cream.

*To make whipping cream, put the cream into a narrow deep bowl. Whip on high with blender. BUT make sure you don’t over whip or you will have butter.


Strawberry Sauce ala Avery

Ingredients:

1 pt. strawberries, cleaned and hulled

½ cup sugar

1 teaspoon vanilla

1 teaspoon Triple Sec (or favorite liqueur)

Directions:

Cut half of the strawberries in half and set all of the strawerries into a saucepan with the sugar and vanilla and Triple Sec. Heat over medium heat. Cook, stirring occasionally, for about five minutes, until the sauce gets thick.

Remove from the heat.

If you like, take half of the suace and blend in a blender to puree. Add the puree back to the rest of the sauce. Store in the refrigerator.


QUICK STRAWBERRY AND CHEESE APPETIZER

For a quickie fun appetizer, set out 8 ounces of sort cream cheese on a platter. Surround with crackers of your choice. Drizzle with the strawberry sauce. [For my photo, I think I put on a little too much strawberry sauce, but it was delicious all the same.]


Click here to get printable recipe card for shortcake
Click here to get printable recipe card for strawberry sauce
*****************

Question of the day: what's your favorite summer fruit?

Just a reminder, I'm having a LOST AND FONDUE launch contest that runs from now until May 3, the day LOST AND FONDUE comes out. Details are on my website, but here's the skinny. All you have to do is read THE LONG QUICHE GOODBYE (in your library, at the store, on your Kindle, I don't care) and tell me where you find TUSCAN TARTUFFO CHEESE. HINT!!!! [It's not too far into the book. Like...no more than three chapters.] You'll write me, via the website, and you're entered. 1st prize is either a fondue pot OR $50 gift certificate to your favorite booksellers. There are other prizes as well. Tell a FRIEND.

CLICK THIS LINK to learn more.

Also, check out my blog tour schedule LINK. There are little surprises in store while I'm on the "virtual road".

Enjoy!