Saturday, July 31, 2010

Magic Peach Cobbler

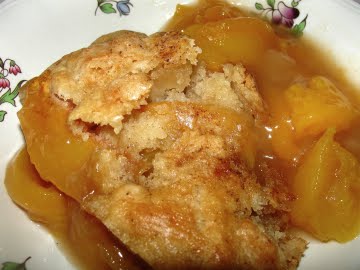
I am fascinated by oddball recipes that seem to work like magic. One of my favorite recipes for soup involves pouring boiling water over all the ingredients. So when I ran across Magic Peach Cobbler, I had to try it. I found variations on this recipe in Amish cooking, and lots of people claim a variation as their grandmother's favorite peach cobbler. Whatever the roots, it appears it has been around for a long time.


What makes it magic? You pour boiling water over the whole thing and via the magic of baking, it comes out as cobbler! The water magically transforms the dough and the peaches into exactly what they should be. It even leaves a little crunchy sugar on the top. Grandmas knew what was good! And if you're looking for an excuse to make Peach Cobbler -- National Peach month starts tomorrow!


I'm sure it has been mentioned here before, but it makes life so much easier that I'll say it again. Put on a pot of boiling water and slide your peaches in it for a couple of minutes to make peeling them soooo easy. You'll be amazed by how easily the peel slides off.


Magic Peach Cobbler


6-7 fresh peaches
1 teaspoon lemon juice

1/2 cup butter
1/2 cup sugar
1/2 teaspoon nutmeg
1/2 teaspoon salt
1 1/3 teaspoon baking powder
1 cup flour
1/2 teaspoon vanilla

1/4 cup sugar
1/4 cup light brown sugar
1 cup boiling water

Lightly oil a 9 inch square baking tin and preheat over to 350.

Peel and slice the peaches. Sprinkle with lemon juice and turn once or twice.

Cream the butter with the sugar. Add the nutmeg, baking powder, and salt and beat well. Add the flour and beat. Add the vanilla and mix. The dough will be crumbly.

Mix the remaining 1/4 cup sugar and 1/4 cup light brown sugar. Boil water.

Pour half the peaches into the baking pan. Crumble half the dough over top of them. Add the remaining peaches, and crumble the rest of the dough over top. Sprinkle with the sugar mixture. Pour the boiling water over the whole thing.

Bake at 350 for one hour.


Enjoy!

Friday, July 30, 2010

WINNER! AND THE LATTE CUP WINNER IS...


Thank you to everyone who entered my FLASH drawing today for the Gimme Coffee Latte Cup and Saucer. If you did not win tonight, come on back! You'll have many more chances to win this very same latte cup as well as other great prizes.

(Pssst...SUNDAY will be
your next chance to win!)


I'm just getting started with my ROAST MORTEM RELEASE PARTY drawings and giveaways. Keep watching this blog, my Facebook page, or my official Web site http://www.coffeehousemystery.com/ for more contest announcements.


As for tonight's drawing...
I assigned a number to everyone who commented on my Liquid Candy Strawberry Syrup post (either here on this blog or on my Facebook page), and I used a random number generator to select the winner.


Congratulations to tonight's winner
of the Gimme Coffee Latte Cup....


Mason Canyon
of

Mason: I will e-mail you shortly and you can let me know
the address where I can send your prize!

Thanks again for entering, everyone!

Until next time...

Eat with joy!

~ Cleo


Got Ripe Strawberries? Make Cleo Coyle's Pourable Candy Strawberry Syrup!


And now it’s time to cook up
something more than crime…


Summer is the very best time for fresh produce--and that includes fresh berries. Fresh strawberries in particular are plentiful these days, which means they are also reasonably priced. But the embarrassment of riches in your fridge can turn into flat out embarrassment when you buy too much at one time and the fruit becomes overripe or begins to spoil before you can enjoy it.


“Waste not!” I say. Turn that uber-ripe fruit into a delicious, sweet fruit syrup. Of course, sweet, homemade strawberry syrup is delicious drizzled over ice cream. But it’s also wonderful over pancakes and French toast. You can enjoy it over a slice of pound cake with fresh strawberries or short cakes topped with strawberry slices and whipped cream for a classic strawberry shortcake.

All things considered, this recipe is truly amazing: Two simple ingredients, a few easy steps, and you have liquid strawberry candy. And isn't THIS a much prettier end to spoiling fruit than the trash bin?


Cleo Coyle is the
author of the bestselling
Coffeehouse Mysteries.
To learn more,
click here!

Cleo Coyle's
"Like Liquid Candy"
Strawberry
Syrup


To get this recipe in a free PDF document that you can print, save, or share, CLICK HERE.


Ingredients:
2 pints ripe strawberries
+ 1 cup sugar

Yields:
about
1-1/2 cups syrup


Method:
Step 1 - Prep the strawberries: Hull, wash, and lightly drain the berries but do not dry. Slice the wet berries into a bowl and toss with ½ cup of the sugar. Cover bowl loosely with a paper towel and let stand for 30 minutes to an hour, allowing liquids to accumulate at the bottom of the bowl.


Step 2 - Cook the Strawberries: Pour the entire contents of the bowl (berries and all excess liquid) into a saucepan. Bring mixture to a full boil. Turn heat down a bit and simmer for about eight to ten minutes. You want the fruit to cook down, collapse, soften and give up its liquid.
I wish the Internet had a SMELL THIS hot button option so I could tell you to click here and enjoy! The aroma of the strawberries cooking is intoxicating. And that incredible scent is perfectly captured in the taste of the finished syrup. 


Step 3 - Strain the Strawberries: Place a fine mesh sieve over a bowl. Pour contents of saucepan into the sieve and catch all the delicious liquid in the bowl. Use the back of a large spoon to press and squeeze the cooked fruit. Come on, tap into your inner serial killer! When you’ve gotten as much liquid as you can out of the fruit, discard the pulpy remains that are left in the sieve.


Step 4 - Heat Once More: Return the gorgeous ruby liquid in the bowl back to the saucepan. Add the remaining 1/2 cup sugar. Bring to a boil over medium-high heat. Turn heat down a bit to simmer and stir for five to ten minutes. You are looking for the sugar to dissolve and the sauce to darken and thicken. Remove from heat and cool. Strain once more if you like.

While still warm, the finished strawberry syrup
should be pourable but thick enough to coat a spoon.


After chilling overnight, the strawberry syrup will thicken even more.
If you prefer a thinner consistency for pouring over pancakes
or ice cream, simply place a portion in a bowl and whisk in a little water
until the syrup is as thin or thick as you want it for your purposes.
(Store your finished syrup in an airtight container in the fridge.)
Serve over ice cream. Or try it over pancakes, pound cake, angel food, or short cakes. Include fresh strawberries and whipped cream and you’ve got a beautiful, colorful summer treat. To store, allow syrup to come to room temperature and place in an airtight container in the refrigerator and...


Eat with joy!


~ Cleo Coyle, author of 


To get more of my recipes,
enter to win free coffee, or
learn about my books,
including my bestselling
Haunted Bookshop series,
visit my online coffeehouse:


The Coffeehouse Mysteries are national bestselling
culinary mysteries set in a landmark Greenwich Village 
coffeehouse, and each of the ten titles includes the 
added bonus of recipes. 


The Ghost and
Mrs. McClure


Book #1 of 

The Haunted Bookshop
Mysteries
, which Cleo writes
under the name Alice Kimberly
To learn more, click here.

Thursday, July 29, 2010

WINNER! WE HAVE A WINNER! OUR GRAND PRIZE GOES TO...

Last week, Mystery Lovers' Kitchen celebrated its 1 year anniversary. Our virtual "Blogoversary" Cookout included prizes every day for our wonderful followers -- and a single, grand prize of a Cuisinart Ice Cream Maker! (Clapping, cheering, whooping, whistles!)

We used a random number generator to select a winner among all of the comments starting last Monday and ending last Saturday evening. At this time, it gives us great pleasure to announce our Grand Prize Winner.


And the winner is...
                              
Drumroll....

"Hippie Mama Kelly"
of

Congratulations Kelly! We are contacting you by leaving a comment on your blog and via the e-mail address that you provided. We hope to hear back from you that you accept the prize. If we don't hear from you in 2 weeks time, we will select a new winner from the same group of comments that we received last week.

Happy Ice Cream Making, Kelly!  (Pssst, you might want to check out Cleo's recipe post for Friday, July 30. It might just come in handy after you start using your new Cuisinart!)

Cheers from all of us at Mystery Lovers' Kitchen...
(alphabetically, we are)...

Avery Aames
Riley Adams
Cleo Coyle
Krista Davis
Julie Hyzy
Jenn McKinlay
and our honorary Mystery Lovers cook for July...
Wendy Lyn Watson

Mystery Lovers Kitchen
Mystery Writers Cooking up Crime...and Recipes!


FOLLOW OUR BLOG SO YOU DON'T MISS
OUR NEXT PARTY...

THE MYSTERY LOVERS' KITCHEN
END-OF-SUMMER LABOR DAY BASH!

We'll have prizes, surprises, another grand prize,
 and a special week of recipes. Don't miss it!


Stewed Corn

RileyAdamsFoodBlogPostpic_thumb_thumb

One of the best things about summer is the produce.

It’s all fresh—which makes me want to eat more of it. You can almost taste the sunshine in the tomatoes and corn.

There are a lot of farmers’ markets and vegetable stands that pop up in the summer.2010-06-27 12.47.14 The one in the picture is a stand that I visited while I was at the beach in Harbor Island, SC. Everything looked so good—it was easy to spend more money than I’d planned on.

And sometimes you really don’t want to mask that summery, fresh taste of the produce. That’s why tomato sandwiches are so popular in the summer, I think. If you’re looking for a basic way to cook corn where the flavor really comes through, here’s an easy, basic recipe:

2010-07-01 15.03.02

Stewed Corn

8 ears corn
1/2 cup milk
1 T butter
salt and pepper

Scrape the corn off the cob with a sharp knife, leaving about ¼ of the kernel attached to the cob. Scrape out the milky pulp of the cob with a spoon. Place corn and pulp in a saucepan. Add water to barely cover. Cook gently for 20 minutes. Add milk, butter, salt and pepper. Cook until it thickens.

Happy summer!

Riley/Elizabeth
Delicious and Suspicious (July 6 2010) Riley Adams
Pretty is as Pretty Dies –Elizabeth Spann Craig
http://mysterywritingismurder.blogspot.com

Wednesday, July 28, 2010

Calzones Like the Pros

My family can't exactly trace its roots to the Mayflower. In fact, I'm not sure I want to dig too deep into my ancestry. I shudder to think what sort of unsavory characters I might find in the old family tree. But if I were a betting woman, I would bet good money I don't have more than a drop or two of Italian blood.

That doesn't mean my people don't cook Italian. In fact, my Grandma Mary Ellen learned to cook as a young bride from the Sicilian woman who lived next door. I grew up (and out) on Grandma Mary Ellen's spaghetti and lasagna, and the highlights of the Christmas season were her panettone and pizzelle.

I haven't been brave enough to try panettone, and I don't have a pizzelle iron, but pizza, lasagna, and various lighter pasta dishes are regulars on the menu in our house. Recently, I discovered a great recipe for calzones, and they're rapidly becoming a staple in our kitchen. The dough goes together like a dream (if you have a stand mixer), and the filling is easy and delicious. Putting them together takes a bit of labor, but with just a little practice you'll be filling, folding, and crimping like a seasoned vet.

If you're cooking for a crowd, each member of the family can customize his calzone with additional fillings (like individual pizzas). If you're cooking for two, the baked calzones reheat nicely, so there's no waste here.

Ricotta and Spinach Calzones

Dough:

4 c. bread flour
1 envelope (2 1/4 tsp.) instant yeast
1 1/2 tsp. salt
2 Tbs. olive oil
1 1/2 c. + 1 Tbs. warm water

Seasoned Oil:

1/2 c. olive oil
2 Tbs. minced garlic
1/2 tsp. red pepper flakes

Filling:

2 Tbs. seasoned oil
15 oz. ricotta (whole milk or skim)
2 c. shredded mozzarella
3/4 c. grated parmesan
10 oz. frozen spinach, thawed and water pressed out
1 egg yolk
1/4 tsp. salt
1/8 tsp. pepper
1 tsp. dried (or 1 Tbs. fresh) oregano

kosher salt
tomato sauce (from a jar, or combine a 28-oz. can of crushed tomatoes with a couple tablespoons of seasoned oil, a dash of salt, and a teaspoon or two of sugar - simmer on low for about 1/2 an hour)

First, make the dough: in bowl of standing mixer, combine flour, salt, and yeast. Attach to mixer with dough hook. With mixer on medium-low, add olive oil and then water (slowly!). Continue mixing for 10 minutes, until dough is smooth and elastic. Transfer to large bowl sprayed with nonstick spray. Cover with plastic wrap (also sprayed with nonstick spray) and place in a warm spot to rise for about 1 1/2 hours (until doubled in size).

While dough is rising, make seasoned oil. Combine oil, red pepper, and garlic in a small skillet or saucepan. Heat over medium heat until the garlic sizzles and just starts to color. Remove from heat and let sit for 10 minutes, stirring occasionally. When the oil is cool, strain the oil and dump the garlic/pepper flakes.

Now make the filling: mix the ricotta with the seasoned oil and the egg yolk, then the salt/pepper/oregano. Finally, mix in the parmesan, the mozzarella, and the pressed spinach.


About an hour into the dough rising time, ready the oven. Put the rack on the very lowest setting. Put a pizza stone on that rack. Preheat the oven to 500 (the stone will need to heat for half an hour after the oven reaches its temperature).

When the dough has risen, divide it into 6 equal portions. Shape into balls and place on a parchment lined baking sheet. Cover with oiled plastic wrap and let rest for 15 minutes (no more than 30).


On a pastry mat, roll out each dough ball into a 9 inch round (roughly). Place each round on a 9 inch square of parchment paper, and stack them (keeping the top round covered with plastic wrap). When they're all rolled out, take each round and plop about 1/2 a cup of filling in the middle. Add any other goodies you want (well-sauted/drained mushrooms, sundried tomatoes, chopped artichoke hearts, etc. - just make sure the fillings don't have much liquid in them).


Fold over top, leaving a 1/2 inch of the bottom round showing. Fold that 1/2 inch up over the top piece and crimp around. Trim parchment. Using a sharp knife, cut a few vents in the top layer of dough. Brush calzones with seasoned oil and sprinkle with a little kosher salt.

Slide the parchment pieces onto a pizza peel and then onto the pizza stone. Bake 3 at a time for 11 minutes, until golden brown. Remove from oven, throw away parchment, and let cool on a wire rack for a few minutes before serving.

Enjoy!

Visit me on the web for more recipes, or become my friend on Facebook, or even follow me on Twitter!

And don't forget that Scoop to Kill, the second Mystery a la Mode, is available for pre-order right now and will be released on September 7.

Tuesday, July 27, 2010

Sneak Peek at Some Hummus


Hummus was first foisted upon me a few years ago by a woman standing next to the appetizer table. "Try that," she insisted, pointing to a bowl of bland-colored goop.

"What is it?"

"Hummus."

Okay... I'd heard of hummus, but until that point had never tried it. Gamely I dipped a chip and took a big bite.

As I did, the woman continued, "I bought this hummus at [whatever] store. Isn't it great?"

Umm... no, it wasn't. "Delicious," I lied, and quickly moved on to the bacon-wrapped shrimp. Uh-huh. Now that's an appetizer!

I have had occasion to try hummus again, and although the flavored ones aren't as bad as that first taste I experienced, they're nothing to write home about, either. What did all these unpleasant hummuses (is that how you pluralize it?) have in common? They were store bought.

My next WHChef book has a hummus recipe in it. I groaned inwardly when I saw it (as you may recall, my "ghost chef" comes up with those recipes). "Not hummus!"

But how could I disparage one of my own recipes? Especially when chick peas (a/k/a garbanzo beans) are so good for you? -- Low-cal, low-fat, high fiber! I couldn't. So I tried it at home just to say I did. And you know what? I liked it. My family liked it. We've made it again and my husband insists on double recipes when I whip up a batch.

Super easy, this recipe is a slight deviation from the one that will appear in Buffalo West Wing(coming in January) but it's perfect because it's all made in a blender. No heating up the kitchen!

(And just so you know, the recipes in this next book are *amazing*! This one is just one tiny example. This time my ghost chef went all out!)

Hummus

1 16 oz can of chick peas/garbanzo beans, drained (but save the liquid!)
4 - 6 cloves garlic, crushed
Juice of one lemon (use fresh squeezed. Makes a huge difference!)
1/2 tsp salt
Chives for garnish
Olive oil
Chips to dip

In a blender combine chick peas, garlic, and lemon juice and salt. I like to start with only about 1/3 of the peas in the blender, and then I add more as I go. This way the blender doesn't get stuck because there's too much in there at once. Puree the mixture, adding a little bit of reserved chick pea liquid as needed. Keep adding and blending until the mixture is of dippable consistency. Like a very thick soup.


Pour into a serving bowl, drip a Tbsp or so of olive oil in the center, top with chives, and serve. This is pretty strong (really strong!), garlic-wise and the flavor will stay with you all day if you're not careful! And, be forewarned, every day this sits in the fridge, the flavor gets more intense. We love it. Hope you do too!

Just a quick FYI - I won't be monitoring comments today. Circumstances (good ones!) are taking me away from the Internet. But I will definitely check back as soon as I can, so please share your hummus stories! I can't be the only person who had to learn to love it!

Talk soon!

Julie
www.juliehyzy.com


Monday, July 26, 2010

The Long Quiche Goodbye - new recipe

As many of you know, I've been touring to launch my debut book, The Long Quiche Goodbye. What fun this has been. So many people, so many cities. I'm in a bit of a fog. But delighted! I'll detail it all in my next newsletter (see link below), but in the meantime, I wanted to share a few tidbits.

Mare F, a cozy aficionado and regular commenter to this blog, came to the book signing in Canton, CT. I was thrilled to see her. She surprised me by bringing
me these delightful handmade items.

A "cozy" that is not for teapots but for carafes, so it'll keep a pot of iced tea, or my favorite a carafe of wine, covered while on the porch.

And a knit bag that will carry groceries! Aren't they beautiful???

Talk about making me feel special.

Thank you so much, Mare.

Look for a "Long Quiche Goodbye" refrigerator magnet as a real thank you.


Today I'd like to share another recipe from The Long Quiche Goodbye: Polenta with Basil and Taleggio.

As you know, Grandpere's barbecue sauce [shared July 5 on the blog] was mentioned in the book, but it wasn't a recipe included at the end. This one is. There are four recipes.

Polenta is pretty darned simple. This is a dressed up version. I've included the recipe here, but you'll also find it right before the sneak preview chapter of book two: Lost and Fondue, on page 313.

There's something wonderfully comforting about polenta. It has a melt-in-your mouth texture. Add a strip of taleggio on top, and it's double-melt-in-your-mouth. Taleggio is a washed rind, cow's milk cheese from the Lombardy region of Italy. It has a strong aroma but a mild taste and melts great.

But here's the thing. Polenta can be scary to cook. It pops, it bubbles, it spits at you. It's sort of like a dragon! Be prepared. Use a tall pot, use a long spoon, and definitely wear a cooking mitt.

POLENTA AND TALEGGIO-BASIL

[6-8 portions]

4 cups water

1 tsp. salt

1 cup polenta corn meal

1 cup fresh basil leaves separated

2-4 Tbs. extra-virgin olive oil

8 oz. Taleggio cheese, thinly sliced

Bring water and salt to a boil.

Add polenta corn meal in a thin stream. Keep stirring until corn meal pulls away from sides of pan. (No lumps) Turn down heat to simmer for 25 minutes, stirring every 5 minutes or so.

While it is cooking, stir-fry the basil in olive oil until crispy, then drain on paper towels.

Spoon hot polenta on to each plate. Lay a couple of slices of Taleggio cheese on each portion and finish with the fried basil.

Enjoy!

~Avery

If you want to subscribe to my newsletter to get the latest updates on cheeses, my book tour, etc., click this LINK.

SAY CHEESE!

Sunday, July 25, 2010

Ice Cream Scoop Winner!


Congratulations to Raelena ... her lucky #21 post was selected by an online random number generator as the winner of the Zeroli ice cream scoop!

Raelena, I'll e-mail you to get your mailing addy ...

Welcome Guest Blogger Deborah Sharp

Today we’re welcoming mystery author Deborah Sharp to the Mystery Lovers’ Kitchen! Deborah writes the Mace Bauer mysteries—and each book is filled to the brim with Southern flavor and humor. Thanks for dropping in, Deb!

DeborahSharphideousveil My husband thinks I've lost touch with reality, just because I'm a bit wrapped up in the matrimonial theme of my latest mystery, MAMA GETS HITCHED,

''You do know Mama is a fictional character, right?''

''What's your point?'' I snapped at him, as I tied tulle to ''Mama's'' bridal veil, which I wore for the book's launch party last week. (See photo of me in our backyard, practicing keeping my head from flopping over under the weight of so much nuptial foppery).

I've made favors, written vows, even had a wedding cookie custom-made with ''Best Wishes, Mama and Sal.'' All for a woman who doesn't exist and a wedding that never really happened.

So, when Elizabeth extended an invitation to join the talented foodie-authors at Mystery Lovers Kitchen, I knew immediately what I'd do. I'd fake it. Fact is, my husband and I have no children, and he travels some 200 days of the year as a TV reporter. I spend a lot of time alone, and I'm not even close to being the kind of cook the gals at the Kitchen are. If I contributed a REAL recipe for what I eat at home, it'd be tortilla chips heated in the toaster oven with onions, jalapenos, and melted cheddar cheese. In my defense, I always remove the chips from the metal tray and plate them before eating.

Weddings, though, are all about food. I actually gave a lot of thought to what Mama would serve when she ties the sacred knot of matrimony for the fifth time. For the launch party, I even replicated the punch served at Mama's bridal shower, from one of my favorite scenes from the book. I'm happy to report that no fistfights broke out at my book party. Unlike at Mama's shower, no high-heeled guests ended up rolling around on the floor in spilled punch and cake icing.

One guy at the signing did point out that Mama's Nuptial Nectar had a peculiar yellowish tinge. ''I learned in the Army not to drink any punch of that particular color,'' he announced to the audience.

See? I told you I'm not the person people usually beg for recipes. Truly, the punch was delicious. But if you decide to try it, you may want to increase the ratio of bright red cranberry juice.

Mama's Nuptial Nectar Punch

Ingredients

2-liter bottle of ginger ale
1 liter lemon-lime soda
Juice of 1 lime
1/2 large can pineapple juice
1 cup cranberry juice
2 cups rum (or more, depending on the crowd)
1 each, lemon and lime, thinly sliced
1 small jar maraschino cherries
Steps
Pour soda and juices into large punch bowl
Decorate with sliced citrus and cherries
Avoid inviting guests who may start a fight, knock over the cake, and shatter your grandma's punch bowl

Mama Gets Hitched Deborah Sharp writes the funny, southern-flavored Mace Bauer Mysteries. The third book in the series, MAMA GETS HITCHED, came out July 1 from Midnight Ink. Deborah, a former USA Today reporter, is married to NBC TV correspondent Kerry Sanders. They live in Deb's hometown of Ft. Lauderdale, where she spends entirely too much time in restaurants, avoiding her kitchen.
You can catch up with her on the web:
http://www.DeborahSharp.com

Saturday, July 24, 2010

His and Hers No-Fuss Summer Pies


Happy Anniversary MLK!


Leave a comment today, and you might win the Rolls Royce of ice cream scoops: a Zeroli!

AND...today is your last chance to leave a comment and be entered to win this week's grand prize, a fabo Cuisinart ice cream maker

As you might have guessed from my ice-cream themed mysteries and my ample ampleness, I dig dessert. Among my circle of friends, my reputation as the Dame of Desserts, Sultana of Sweets, Pasha of Pastries means I'm bringing some confection or other to every gathering ... including this cyber-celebration for MLK's anniversary.

This is not a hardship for me. Not at all.

In the summer, though, it's tough to commit to anything that requires hours of oven time. Our air conditioner has a hard enough time keeping up with the Texas heat without also compensating for my cooking. Over the years, these two low- and no-bake pies have emerged as the all-round crowd favorites for summer picnics, barbecues, and pool parties.

Mr. Wendy, love of my life and father-figure to my cats, loves the Black Bottom Banana Cream Pie (possibly even more than he loves me). I, on the other hand, am partial to the Caramel Knowledge Pecan Pie. I'll let you pick your poison ... or, if you're not too worried about sugar shock, make one of each.

Black Bottom Banana Cream Pie

Crust:

1/2 c. unsalted butter
3 ozs. semisweet chocolate, chopped
1 1/2 c. chocolate wafer cookie crumbs (about 7 ozs.)

Ganache:

1/2 c. whipping cream
1 Tbs. unsalted butter
4 ozs. semisweet chocolate, chopped
1/2 tsp. vanilla extract

3-4 ripe bananas (about 1 1/2 pounds)
2 - 4-serving boxes of instant vanilla pudding
2 3/4 c. milk (skim is fine)

For crust, stir butter and chocolate in a small saucepan over low heat until smooth. Remove from heat and mix in cookie crumbs. Lightly butter a 9-inch pie plate. Press crumb mixture in bottom and up sides of pie plate. Chill in refrigerator about 30 minutes.

For ganache, heat cream and butter in medium saucepan over medium heat until butter melts (but do not boil!). Remove from heat and whisk in chocolate and vanilla until smooth. Reserve 2 Tbs. ganache and pour remainder over crust. Chill about 30 minutes.

Thinly slice bananas and arrange over ganache. Following package directions for pie filling, prepare vanilla pudding and pour over bananas. Drizzle reserved ganache in a spiral on the pie, then draw a toothpick from the center to the edge of the pie at intervals around the circle. This will create a spiderweb design.

Chill the whole pie for 3 -24 hours.

* Note that you can make this dessert in a 9x13 dish. Simply make a time and a half the recipe (so use 1 1/2 sticks butter for the crust instead of 1 stick). Press crust just in bottom of pan. You'll need 3 boxes of instant pudding.

Caramel Knowledge Pecan Pie

Crust:

1 1/2 c. chocolate wafer cookie crumbs (about 7 ozs.)
5 Tbs. butter, melted
1/2 tsp. vanilla extract

Filling:

3/4 c. (1 1/2 sticks) unsalted butter
3/4 c. light brown sugar
6 Tbs. light corn syrup
3 c. pecan halves
3 Tbs. whipping cream
2 ozs. unsweetened chocolate, chopped

Blend all crust ingredients in food processor. Press mixture into bottom and up sides of 9-inch pie plate. Cover crust and freeze while making filling.

Preheat oven to 350.

Combine butter, brown sugar and corn syrup in heavy medium saucepan. Bring to a boil, stirring often. Boil 1 minute. Stir in nuts and cream. Boil until mixture thickens slightly, about 3 minutes. Remove from heat. Stir in chocolate until chocolate is melted and well-incorporated.

Pour hot filling into cold crust. Using spoon, evenly distribute nuts. Bake until filling bubbles all over, about 10 minutes. Transfer pie to rack and cool. Serve with vanilla ice cream or whipped cream. (The last time I made this, I made Bailey's whipped cream: 2 c. whipping cream, 2 Tbs. sugar, and 1/2 c. Bailey's, whipped until soft peaks form.)


* This recipe, also, can be adapted for a 9x13 pan. Just use a time and half of all measures. (So instead of 1 1/2 c. cookie crumbs, use 2 1/4 c. cookie crumbs.)


Wendy Lyn Watson writes the Mysteries a la Mode, featuring amateur sleuth Tally Jones who solves murders in between scooping sundaes. I SCREAM, YOU SCREAM is available now, and SCOOP TO KILL is available for pre-order.

You can follow Wendy on Facebook or Twitter, too!

Friday, July 23, 2010

Cleo's Friday Winner of the "Gimme Coffee" Latte Cup and Saucer

Sending hugs to all of you who left such wonderful comments and entered my Anniversary Week drawing for the "Gimme Coffee" Latte Cup and Saucer!

If you commented on my blog post and did not win tonight, don't forget that you are automatically entered for our GRAND PRIZE of a Cuisinart Ice Cream Maker. Keep watching this blog for the announcement of our winner for the week.

AND...stay tuned for more chances to win my Latte Cup and Saucer prize and more fun prizes in August, during my Book Release Blowout Party for my soon-to-be published 9th Coffeehouse Mystery, Roast Mortem.

Until then, only one randomly chosen commenter will win the latte cup and saucer tonight and that person is...

Cindy Waffles
of the Looky Tasty blog!

Congratulations, Cindy! I will contact you via your blog's e-mail address straightaway. And you can e-mail me (Cleo Coyle) at VillageBlend@aol.com

Be sure to come back Saturday for a delicious dessert and another fun mystery prize from author Wendy Lyn Watson!

Warmest wishes,
~ Cleo Coyle