Sunday, September 30, 2012

Welcome Paige Shelton and Loaded Potato Chips

-->
The Kitchen is delighted to welcome foodie mystery writer Paige Shelton to the blog today.  Paige is the author of the hugely popular Farmers' Market Mysteries and the Country Cooking School Mysteries.  
 

Thanks to everyone--the authors and the readers--at Mystery Lover’s Kitchen for letting me stop by today!

This recipe started out as a simple experiment: I wanted to figure out how to make baked potato chips. I love potato chips. Being more a “salt” person than a “sugar” person, I wondered if I could possibly create a “healthy” version of one of my favorite snacks – well, I should probably say a “less unhealthy” version, but I bet you get what I mean.


The experiments weren’t successful. I either burnt the “chips” or didn’t cook them thoroughly enough.
  I poured on too much salt or not enough. And, nothing I created really tasted all that good.  It was a bust. I still had a couple potatoes left over, though, so before I gave up completely, I opened the fridge and realized it was time to ditch the “less unhealthy” idea and just shoot for something that simply tasted good. It turned out to be a much better plan, and, basically, another take on the loaded baked or wedged potato.

This is a very flexible recipe, so following are guidelines more than specifics.


What you’ll need:
   
Baking sheet(s)
Foil
Potatoes, scrubbed clean
Vegetable Spray (I use Pam)
Lawry’s Seasoning Salt
Shredded cheddar cheese
Bacon bits – I use Hormel Real Crumbled Bacon
Sour cream
 

Preheat oven to 400 degrees.

Place foil on your baking sheet and spray with a liberal coat of vegetable spray.

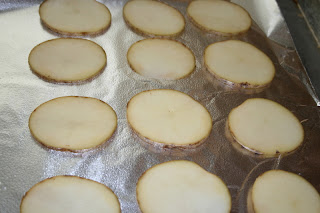
Slice potatoes – it’s important to keep your slices all about the same diameter and thickness so they cook evenly. Don’t make the slices any thicker than about 1/8 inch, but you can also make them very thin if that’s your preference. My taste testers (husband and son) liked them best on the thicker side.

Place potato slices on the prepared foil and then spray with another coat of vegetable spray. 


Season with the Lawry’s – a little goes a long way. Even if you like salt, you might want to keep this pretty light.

Bake – to your desired consistency. Thin chips will get brown around the edges in about 7 – 10 minutes. Thicker ones will need around 20 minutes to get a little brown. I’ve never left them in a full 30 minutes. I thought crispy would be better, but my taste testers liked them best baked through but not crispy.

When they’re almost done (well, done enough to eat as is), take them out of the oven. Sprinkle a little cheese and a couple pieces of bacon bits on each potato. Place back in the oven for about 30 to 60 seconds until the cheese melts.

Serve immediately, with sour cream if desired. They go quickly. After I pulled the first successful batch out of the oven and left the kitchen for a second, the sheet was cleared by the time I returned.  Forks are needed. They seem like they should be finger food, but they really aren’t.

Of course, all potato toppings, other spices, other salts, will probably work as well, but we’re enjoying this combination so much that we haven’t tried others yet.


Enjoy!


Thanks, again, for letting me stop by. Wishing you all happy reading and yummy eating.


* * *
 

Paige's second Country Cooking School Mystery, "If Mashed Potatoes Could Dance," will be released on October 2.  You can find it at Amazon, Barnes and Noble, and Indie Bound

Her next Farmers' Market Mystery, "A Killer Maize," will be out in December and is available for preorder now!


 

Saturday, September 29, 2012

Crockpot Greek Yogurt

by Peg Cochran

I found several recipes on-line for how to make your own yogurt.  When I found one for making yogurt in your crockpot--something I already had--I was thrilled!  It's really easy and in the morning--surprise! You have Greek yogurt (after straining) for a fraction of the cost of a store-bought brand.  As my girlfriend said when she made it, she expected to wake up and find herself wearing Berkenstocks.  It's such an earthy, grounding experience to make your own yogurt.

You'll need a crockpot and a thermometer.  Most recipes called for a candy thermometer, but I found that an instant read one works just fine.  And you'll need some starter that has LIVE cultures in it.  I bought a container of one of the popular brands of Greek yogurt, and it had six different live cultures in it.  It's a little creepy to think about eating live anything, so I didn't dwell too much on that part!  You'll need about half a cup.  After you make your first batch, you can freeze (yes, freeze) a half a cup of it to start your next batch.

Pour 1/2 gallon of milk into your crockpot.  I use 1/2% but you can use skim or whole or whatever you prefer.  Turn your crockpot to low.  Depending on the age of your crockpot (older=colder) it may take anywhere from 2.5 to 3 hours to reach 180 degrees.  Check it  with your trusty thermometer to be sure. When the milk reaches that temperature (you'll see bubbles around the edge), turn off the crockpot and take off the lid.  You want the milk to cool to between 105 to 110 degrees.  That will take an hour or more.

Once you've hit that temperature, whisk in your starter, cover it and wrap it all up in a giant beach towel.  Leave it on the counter overnight, and in the morning you'll have yummy, delicious, additive-free yogurt!

Milk heating in the crockpot

Sitting overnight wrapped in a towel

Straining the fresh yogurt to make Greek  yogurt

Finished product!
To make Greek yogurt, line a strainer with two layers of cheesecloth or a clean, white tea towel and place in a large bowl.  Spoon in your yogurt and place in fridge.  You may need to empty the bowl occasionally of the "whey" which will drain from the yogurt.  Drain it until it reaches the desired thickness.  I sometimes leave some of it to drain for 8 hours while I'm at work.  It gets to be as thick as sour cream and can be used to make dips for raw veggies.  If it gets too thick, you can stir some of the whey back in.


I read that you can make ricotta cheese with the whey, but it requires a LOT more than one batch of yogurt will produce so I haven't tried it.  I also read that instead of throwing the whey down the drain, water your plants with it!  It's good for them!
First in my Gourmet De-Lite Series
Writing as Meg London

Friday, September 28, 2012

MUSHROOM RISOTTO

by Sheila Connolly


In case you haven't heard, today marks the 75th anniversary of the publication of The Hobbit by J. R. R. Tolkien.

 
I was lucky to read The Hobbit and the following Ring Trilogy at the right time in my life, and they have stayed with me since I was a teenager. I still have my copies from long ago, and I have reread them many times.

 
In Tolkien's mythical world, hobbits liked to eat.  And seeing as they lived in a part of Middle Earth that looked a lot like rural England (as it was in the 1930s), they also liked mushrooms.  When the hero of the Trilogy, Frodo Baggins, was young, he used to steal mushrooms from a local farmer, who set the dogs on him, since wild mushrooms were prized; later in the saga, Frodo and his traveling companions encountered the same farmer again, and this time he gave them a basket full of newly-picked mushrooms.

 
I hated mushrooms for much of my early life, and it was only as an adult (and a cook) that I came to appreciate them.  Now I revel in them (as you have seen in posts here).  This week at Wegman's I happened upon a large mass of oyster mushrooms that called to me, and I brought it home.


I suppose most of us think of mushrooms as freestanding things with a stem and a broad cap.  When you buy them packages at your grocery store, that's what you usually get.  But here you can see that the oyster mushrooms grow in a wonderful surging mass (and this is only a partial one!).

 
Unlike the morels I wrote about, oyster mushrooms are delicate creatures with a subtle flavor, so they must be treated gently.  I decided to make a risotto.  Now, before you laugh and move on, let me admit that I avoided making risotto for a long time—it was too much work, because you have to stir.  And stir.  And keep stirring until the thing is done.  But it's worth the effort, because the result is rich and creamy without adding any extra fat or cream.  Pick a dinner when you're not in a hurry and can stay near the stove and you'll do fine.

 
Mushrooms make a great addition to basic risotto, and it's my favorite variation.


MUSHROOM RISOTTO

 
1 cup chopped fresh mushrooms (you pick the variety) (measure after chopping)

5 cups broth (you may use chicken, beef, or vegetable)

2 Tblsp finely chopped shallots

3 Tblsp butter

2 Tblsp vegetable oil

1½ cups uncooked rice (Arborio, the kind with roundish grains, is best, but plain old white rice will do; I don't know if this works with brown rice.  Please, no instant rice!)

½ cup freshly grated Parmesan cheese

 
In a large saucepan, bring the broth to a slow simmer and hold it at that temperature.

 
Melt the butter in another saucepan and add the oil.  Add the shallots and sauté until they are translucent (do not brown).  Add the chopped mushrooms and sauté until the mushrooms give up their juices.

 
Add the rice and stir until the rice grains are well-coated with the butter-oil mixture. 

All the sauted ingredients, ready for liquid

Add one-half cup of the simmering broth and stir until the rice absorbs all the liquid (make sure you get all the grains clinging to the sides of the pan).  Then add another one-half cup of liquid and continue to stir over low heat, making sure the rice doesn't stick to the bottom.  Continue adding the broth and stirring, but wait each time until all the broth is absorbed before adding any more (you don't want to boil the rice!).
 
Start stirring!
 
You may need to practice a bit to make sure the rice is cooking at the right pace—not too slow, not too fast, but just right.  Toward the end it will take longer for the broth to be absorbed after each addition, but you will notice that the mixture is becoming creamy.

 
After about 20 minutes, taste a single grain to see if it is cooked through. If not (the core of the grain will still be hard and white), continue adding liquid and testing until it's done.  In total it should take about 30 minutes.  Don't worry if you didn't use all five cups of the broth—rice can vary. Taste a bit and add salt only if needed.

Yes, there are five cups of liquid in here
 
When you're ready to serve it, add the cheese and stir it in, then dish up!  Okay, it looks a bit like gloopy oatmeal, but it tastes good!


Thursday, September 27, 2012

My Grandmother's Recipe Box by Lucy Burdette


 LUCY BURDETTE: I don't think we've officially told you this, but I'll be writing and sharing recipes on Thursdays from now on, except for the first Thursday of each month when Annie Knox aka Wendy Watson will be posting. (So glad you'll continue to be a part of us Wendy!)

Anyway, the idea of posting more often got me a little panicky. What if I run out of recipes? Or interesting stories about food? For inspiration, I went to my messy recipe drawer, where I found a pile of handwritten recipes in my paternal grandmother's handwriting--what a treasure! 

I can't help sharing the one that was on the top--for Roach Poison. It was written on a piece of a brown paper bag. Is this not perfect for a mystery writer???

In case you can't read it:

Roach poison

1 tsp. cocoa
2 tbsp. flour
2 tbsp. boric acid

Shake well and put in bottle caps

Here's another one of grandma's notecard gems:

 The best cough syrup for a hacking cough is one teaspoon each of gin, lemon juice, and honey. 

Grandma Alice adds that she found this in Life Magazine, and they got it from Dr. Lendon Smith, a Portland, OR pediatrician who had a 5 minute television program "The Children's Hour."

But I can't leave you with only roach poison and cough syrup, so here's my recipe for the best friend okra ever! Living in Tennessee for four years, I learned the joy of this dish.

Do not make this with frozen okra or brown pods. Save it for the time you come across okra at the farmer's market or come by and I'll cut you some pods from our garden! (Possibly the only okra grown north of the Mason-Dixon line...)

Pan Fried Okra

about 20 pods of fresh okra, sliced
1 medium onion, chopped
1 smallish green pepper, chopped
1 egg
1/3 cup yellow corn meal

Slice the okra, discarding the stems and ends. If you notice a woody feeling as you cut, that pod has gotten too big. It will taste like eating straw and your family will say "We knew we hated okra!" so do yourself a favor and throw it out.

Saute the onions and peppers a few minutes in a large frying pan until soft. Meanwhile, beat the egg in a small bowl, then add the sliced okra and stir. Dump the cornmeal over that and stir again.  


Add this mixture to the pan and fry until it looks brown and the egg is cooked. Serve as a side veggie with Tobasco sauce to taste. Or here I had it for supper with sliced tomatoes and my favorite cottage-oat biscuits, which I'll tell you about another time.

And meanwhile, I invite you to enjoy the Key West food critic mysteries, full of food, friendship, and murder--all set in Paradise! PW said about DEATH IN FOUR COURSES: "Anyone who's overpaid for a pretentious restaurant meal will relish this witty cozy."

And please follow Lucy on Twitter @lucyburdette, or "like" her on facebook for all the latest updates.

Wednesday, September 26, 2012

Pasta ala #TheChew


Have you seen 
the new TV sensation, 
The Chew?


My book, THE LONG QUICHE GOODBYE, and a few other culinary mysteries were mentioned, and suddenly I had emails and Facebook posts from friends saying, "Did I see it?" Well, I didn't, but I was able to catch a repeat, and I was thrilled.

Now...if only they would invite me to be on the show. I live in Los Angeles. I could be there in a heartbeat. Flights go hourly to New York. :)


Clinton, Daphne, Mario, Michael, & Carla
I've watched a few episodes since then. I don't watch much daytime television because I'm writing all the time.  Allllll the time. But I tuned in the other day for the first episode of the new season. They talked about their summer vacations. It was so cute. Like they were all coming back to school.  I hope they won't mind, but I snapped a picture from their website of them so you can see their faces.

Anyway,  Clinton Kelly, an effervescent host, shared a recipe he had eaten in Napa. It looked so fabulous that I had to try it. Fresh vegetables, pasta, wine, butter. What's not to like?

Now, Clinton didn't give specifics regarding the portions (other than the butter), but I'm pretty good at eyeballing a TV chef's ingredients.

This is what I came up with, (GLUTEN-FREE because as many of you know, I need to eat gluten-free), and it was delicious. The nutmeg adds just the right touch. The fresh ricotta...divine. Clinton said that he likes a meal that makes him feel like he really had a "meal" and didn't skimp. This is one. Perfect for lunch or dinner.

Enjoy!


From The Chew

Pasta ala Clinton Kelly after he visited Napa

Gluten-free version ala Daryl Wood Gerber

Ingredients:

1-2  tablespoons olive oil
1 clove garlic, crushed
2 shallots, peeled and diced
2 tsp. salt
1 zucchini, diced
1 yellow squash, diced
10-20 baby tomatoes, sliced
½ cup white wine (I used Leitz 2009 Riesling)
1 cube butter
1 fresh tarragon leaf (I used 1 teaspoon dried sage)
1 cup fresh ricotta
nutmeg
2 cups cooked pasta (1/2 cup per serving)
*Clinton used fresh parapdelle – I used gluten-free linguini from Bionature!!

Directions:

Heat oil in a sauté pan. Add the garlic. Do not cook too hot. You don’t want to scorch the garlic or it will turn bitter. Add the shallots, salt. Stir about 1 minute. Add the zucchini, yellow squash, and tomatoes. Stir about 1 minute.


Deglaze the pan with the white wine. It simmers beautifully. Add the butter. Don’t skimp. The liquid will soak into the pasta. Crush and add the tarragon. (I used sage because I didn’t have fresh tarragon. I forgot. The sage was scrumptious!). Stir for about 2-4 minutes.

Set 4 plates with the cooked and drained pasta. Top each with a quarter of the cooked veggies. Top with a healthy portion of ricotta. (About ¼ cup).  Dust with nutmeg.  Serve.

So simple, so delish!  And this version, gluten-free!


PS  The pasta I use and will promote forever is Bionature gluten-free pasta.  [Made in Italy.] 


It is the most delicious pasta on the market. I've had fresh at a few dedicated gluten-free restaurants, and only one in New York, Bistango, has made a pasta better, in my humble opinion. 


***************


REMINDER: To save this recipe (and any that are posted on MLK,  click the Print Friendly button below 

(it looks like this but don't hit this one).  Choose PDF to print. 


* * * * *
The 4th in A Cheese Shop Mystery series: 
TO BRIE OR NOT TO BRIE.  

You can pre-order the book HERE. 

You can learn more about me, Avery, by clicking this link.

Chat with me on Facebook and Twitter.


And if you haven't done so, sign up for the mailing list
 so you can learn about upcoming events, releases, and contests!


Also, you probably know about my alter ego.
DARYL WOOD GERBER... 
Daryl's new series: A COOKBOOK NOOK MYSTERY series
debuts July 2013

"Like" Daryl's page on Facebook and "follow" Daryl on Twitter.
"She" doesn't say all the same things "Avery" does. Promise.


LAST BUT NOT LEAST...okay, maybe least...:)

I'm pleased to announce that my short story, PALACE ON THE LAKE, 
in Fish Tales: A Guppy Anthology has been nominated for both
the Anthony Award and Macavity Award. 
Go Sisters in Crime Guppies! 
Without the Guppies, my career would not be on the right track.
The group support is invaluable!
You can read PALACE ON THE LAKE by clicking on the title above. :)


Say cheese!

***********


Tuesday, September 25, 2012

A Writer's Lunch: Crustless Mini Pizzas and my Trigger Thumb by Cleo Coyle


Writing novels for a living appears to be a perfectly safe occupation. As my fellow authors know, however, the writing life comes with one major hazard. No, we don't dodge flying bullets or psychotic killers (though our characters may). What we combat every day is a more sinister villain: Excess Calorie Man. He lurks behind every extra handful of peanuts or just-one-more-silver of pie.


Even when our diet is relatively healthy, the hours of sitting in front of our computers take their toll as EC Man gets his jollies from as little as a sliced-up banana on a peanut butter sandwich or an extra hunk of cheese with your crackers.

As you can imagine, it’s even worse for a culinary mystery writer. Testing recipes, especially delicious ones like that Blackout Cake (Yes, I’m still working on it! :)), give Excess Calorie Man free reign. Well, today I’m going to show you one way this writer reigns him in...with a lunch of Crustless Mini Pizzas


And below today's recipe I'll explain what a "Trigger Thumb" is, not to be confused with a "trigger-happy thumb," which would put us behind bars. 


Cleo Coyle's
Crustless
Mini Pizzas

Mark Bittman became famous with his 101 foodie idea articles. I swear my mother and aunt could have written one on 101 things to do with Italian squash. As a kid, I took all my pop's homegrown veggies for granted. As an adult, I miss them dearly. This recipe makes good use of zucchini. It's a fun, quickie, kid-friendly lunch my mother and aunt used to make for me as a little girl. Of course, they used homemade red sauce. Today, I took a shortcut with jarred pizza sauce. The brand I picked up was quite tasty, and I can recommend it as a time saver.


To download a copy of this recipe in a PDF form that you can print, save, or share, click here.


Ingredients:

Small to medium zucchini (courgette)

Pizza sauce (jarred or homemade)

Mozzarella, shredded (whole milk or part-skim)

Toppings (see note*)

*Note: Use your favorite pizza toppings from veggies to meat--just be sure any meat is already cooked. Topping suggestions: sauteed, chopped mushrooms; sliced olives; chopped peppers; regular, turkey, or meatless pepperoni or cooked and crumbled sausage, etc.

Directions: (1) Cut the zucchini into slices of 1/4 to 1/2-inch thick. You want the slices thin enough to cook fast under the broiler but thick enough to hold their shapes for handling after toppings are added. Place the slices on a sheet pan. Tip: for easy cleanup, line the pan with a sheet of aluminum foil and lightly coat with non-stick cooking spray. (2) Spoon pizza sauce onto each slice. To save time, use jarred. (If you need a recommendation, I like the Ragu Homemade Style Pizza Sauce, "100% Natural.") Sprinkle on your shredded mozzarella and toppings. As noted, because these pizzas are finished in a flash, make sure your meat toppings are already cooked. If using mushrooms or peppers, I would chop them finely and saute them in a bit of olive oil before adding. (3) Place the pan of mini pizzas under your broiler for 1 to 3 minutes--time will depend on the intensity of your oven's broiler. No matter what, keep a close eye on these because they cook very quickly and the cheese can burn fast. Remove and...eat with crustless joy!

F o o d i e 
P h o t o s


And now...

<< My trigger thumb, which is being sniffed by the curious Clover. 

The reason I'm mentioning it today is because it may help many of you in the future. For days, I wasn't sure what was wrong with my popping, snapping, painful thumb joint. At first, I feared arthritis was setting in. After a little research, however, I realized what I had was a form of tendonitis known as "trigger finger" or "trigger thumb." While researching this, I learned that this condition is common for musicians and lately for folks who do a lot of texting or thumb-typing on tablets. If you do the latter or known people who do, these links were a great help to me in treating a painful and perplexing condition, and they may be worth keeping in your own files...

* Link 1 from WebMd: click here
* Link 2 on non-surgical treatment: click here

I'm using the icing and splinting treatments now. From experience, I know that ice is very helpful for sports injuries, and it's helping with this, as well. Certainly, if you have any experience with this, feel free to share in the comments. In the meantime, may we all eat with joy--and good health!


A Brew to a Kill: A Coffeehouse Mystery
Now a national bestseller in hardcover

To see the recipes in my latest
culinary mystery, click here.


Yes, this is me - Cleo Coyle
Learn about my books here.

Friend me on Facebook here.
Follow me on Twitter here.
Eat with joy!

~ Cleo Coyle, author of
The Coffeehouse Mysteries


To view the
Coffeehouse Mystery
book trailer, click here.


To get more of my recipes, enter to win
free coffee, or learn about my books, including
my bestselling 
Haunted Bookshop series, visit
my online coffeehouse:
 
CoffeehouseMystery.com


The Coffeehouse Mysteries are national bestselling
works of amateur sleuth fiction set in a landmark
Greenwich Village 
coffeehouse, and each of the
12 titles includes the 
added bonus of recipes. 


The Ghost and
Mrs. McClure


Book #1 of 

The Haunted Bookshop
Mysteries
, which Cleo writes
under the name Alice Kimberly
To learn more, click here.