Friday, July 31, 2009

Cleo Coyle's Fresh Glazed Strawberry Pie


Diners, Drive-ins, and Dives. These are the true American coffee shops and I absolutely love them. So of course I’m a fan of Guy Fieri’s Food Network television show of the same name.


(Holla, Guy!)

If you’re wondering if Guy has visited any of your favorite diners or dives, click here and scroll down the right column. The site lists all of the diners and dives that Guy has featured on this TV show thus far...

I have plenty of favorite diners here in Queens, New York, but my heart belongs to EAT 'N' PARK, a beloved regional diner chain located where I grew up, outside of Pittsburgh, Pennsylvania. If you live near the Ohio Valley, you've probably eaten there. The place began during the days of the 1950’s car hops when everyone thought it was real keen to park and eat right in their cars.

Eat 'n' Park doesn’t serve you in your car anymore. They're now a family restaurant and coffee shop chain serving a great American menu and the most amazing fresh glazed strawberry pie I ever had.

My husband and I grew up on this delectable pie and for a lot of summers here in New York we pined for it (be
cause nobody even tries to do it the same way here), so I decided to step up and attempt a copycat Eat ‘n’ Park strawberry pie recipe.


My multiple experiments were…interesting. Witness this beauty to the left. Pretty to look at but about as tasty as waxed fruit. I’d used too much unflavored gelatin, which gave it great firmness but after a few hours rendered it as rubbery as an inner tube.

Next I reduced the gelatin way down—and got soup.

Then I added cornstarch for thickening and the raw, chalky taste made my husband want to gag.

Back to the drawing board…and finally, eureka! A combo of flavored gelatin, unflavored gelatin, flour, sugar, water, and strawberry jam created the best glazed strawberry pie I had ever tasted.

Is it a worthy copycat Eat 'n' Park pie recipe? You bet'cha! Now during the summer, when hot weather begs for a delicious
chilled fruit pie with sweet whipped cream, I whip up this recipe. Ever since I perfected it, making our favorite pie is a piece of . . . well, you know!


Click here or on the picture above
to get my recipe for
Fresh Glazed Strawberry Pie

(The complete recipe will appear in PDF
format and you can save it or print it out.)
For more of my recipes or to find out more about my Coffeehouse Mystery series, visit my *virtual* coffeehouse: http://www.coffeehousemystery.com/

...And don't forget to enter to win our weekly Mystery Lovers' Kitchen contest. The prize is a $25 gift certificate to the Williams-Sonoma kitchenware and gourmet food store. Just sign in to this blog and leave a comment or send an "Enter me!" e-mail with your first name and state to MysteryLoversKitchen@gmail.com Good luck!


~Cleo Coyleauthor of The Coffeehouse Mysteries
http://www.coffeehousemystery.com/
Where coffee and crime are always brewing...

Thursday, July 30, 2009

Lowcountry Boil

Riley Adams Food Blog Post pic In the first book for my Memphis Barbeque mystery series, restaurant owner Lulu Taylor is a barbeque-cooking queen who keeps a loving but protective eye on her family.

What meal would Lulu pick for an easy family get-together? Well, probably not barbeque, since the family eats the mouth-watering ribs at Aunt Pat’s restaurant every day. No, but she’d probably pick something just as Southern and just as tasty. Maybe Lowcountry boil.

Lowcountry boil first originated in South Carolina’s coastal regions, where it was called ‘Frogmore Stew,’ after the town of Frogmore, SC, (which no longer exists.)

The recipe can be easily adjusted to feed a crowd. In the South, it’s frequently served on newspapers laid out on picnic tables for easy clean-up. Just fold up the newspaper and voila! You’re done. For added authenticity, put a roll of paper towels on the table instead of napkins.

This recipe takes about 10 minutes to fix, about 30 minutes to cook. It makes 12 servings, so be sure to adjust as needed for the crowd you need to feed.

Lowcountry BoilLowcountry Boil

  • 5 quarts water
  • 1/4 cup Old Bay seasoning
  • 4 pounds red potatoes (small ones)
  • 2 pounds kielbasa (or any smoked sausage links….as hot to taste as you prefer) cut into 1 ½ inch pieces
  • 6 ears fresh corn, broken in half
  • 4 pounds unpeeled, fresh shrimp (I like the large ones)
  • Cocktail sauce

Bring water and Old Bay seasoning to a rolling boil in a large pot, covered.

Add potatoes and return to a boil. Cook, uncovered, for 10 minutes.

Add sausage and corn, and return to a boil. Cook 10 more minutes or until potatoes are tender.

Add shrimp to stockpot; cook 3 to 4 minutes (sometimes less) until shrimp turn pink. Drain. Serve with cocktail sauce.

And don't forget to enter to win our weekly Mystery Lovers' Kitchen
contest. The prize is a $25 gift certificate to the Williams-Sonoma
kitchenware and gourmet food store. Just sign in to this blog and leave
a comment or send an "Enter me!" e-mail with your first name and state

Riley Adams/Elizabeth Spann Craig

http://mysterywritingismurder.blogspot.com

Wednesday, July 29, 2009

Cake in a Mug or Adventures in the Kitchen


Cake in a Mug or Adventures in the Kitchen

“Mom, is the microwave supposed to be smoking like that?” my oldest son asked.

“I don’t think so,” I said.

And so what had begun as quality time spent cooking (read experimenting) together for me and my sons rapidly turned into a quick lesson in kitchen safety, or more accurately fire safety.

We were cooking a recipe my mother-in-law had emailed us, knowing my weakness for all things chocolate. It is called 5 minute chocolate cake and it is supposed to be a cure for those midnight chocolate cake cravings. Sounds like an urban legend? Sounds too good to be true? I know. So, of course, we had to try it.

This is the original recipe sent to us and posted in a variety of places on the web.

“5 MINUTE CHOCOLATE MUG CAKE
4 tablespoons flour
4 tablespoons sugar
2 tablespoons baking cocoa
1 egg
3 tablespoons milk
3 tablespoons chocolate chips ( optional )
3 tablespoons oil
a small splash of vanilla extract
1 coffee mug

“Add dry ingredients to mug and mix well. Add the egg and mix thoroughly. Pour in the milk and oil and mix well. Add the chocolate chips (if using) and vanilla extract, and mix again. Put your mug into the microwave for three minutes at 1000 watts (vary the time just a little either way according to the wattage of your microwave). The cake will rise over the top of the mug, but don’t be alarmed. Allow to cool and tip out onto a plate if desired. EAT! (This can serve 2 if you want to feel slightly more virtuous).

“Why is this the most dangerous cake recipe in the world? Because now we are only 5 minutes away from chocolate cake at any time of the day or night.”

The boys and I measured out the ingredients into our mugs, chatting while we mixed. Without reading the rest of the recipe, I put mine in the microwave and set it to cook for five minutes. My thinking was that if it’s called five minute chocolate cake, it must take five minutes to cook. Yeah, I know, I need to work on my ability to follow directions. This is not news to anyone who knows me.

Four and a half minutes in and the smoking started. I stopped the microwave and pulled out the charred remnants of cake. It wouldn’t stop smoking. The house was beginning to smell. I poured water on it. Did I mention this recipe has oil in it? Yeah, oil and water are not friends and now
tiny flames were poking out of the charred holes in the cake.

I ran out the back door with my sons on my heels, dumped the cake into the grass and stomped on it. The lawn still bears the scorch marks, which my younger son likes to point out -- frequently.

My husband followed us outside (probably, to prevent smoke inhalation) with the recipe in his hand.

“Darling, it says here you’re only supposed to cook it for three minutes,” he said.

Oh!

Determined to try again, we waited for the smoke to clear and then trooped back inside and cooked the boys’ cakes for three minutes. They came out well. They had a nice chocolate flavor, but they were a bit on the rubbery side.We decided the egg was to blame. So, we started to play with the original recipe. And this is what we came up with:

Chocolate Mug Cake
4 tablespoons flour
2 tablespoons cocoa
2 tablespoons sugar
1/4 teaspoon baking soda
1/8 teaspoon salt
Mix dry ingredients then add the following
3 tablespoons milk
1 tablespoon oil
1/4 teaspoon vanilla
Chocolate chips (I could say these are optional, but in our
world chocolate chips are mandatory).
Microwave for 1 minute.

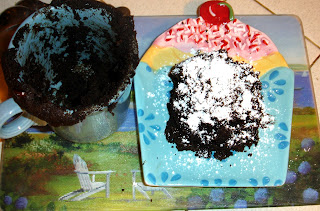


It came out a little dry, so we tried making it with 4 tablespoons of heavy whipping cream instead of milk. This came out moister but almost too rich to eat (if that’s possible).

A scoop of ice cream or a squirt of whip cream and I do think this could cure the midnight chocolate cake craving, but it will never replace the real deal.
If anyone has a more successful microwave cake recipe, please
share. In the meantime, keep experimenting but remember to keep
your fire extinguisher handy!

And don't forget to enter to win our weekly Mystery Lovers' Kitchen
contest. The prize is a $25 gift certificate to the Williams-Sonoma
kitchenware and gourmet food store. Just sign in to this blog and leave
a comment or send an "Enter me!" e-mail with your first name and state

Jenn McKinlay SPRNKLE WITH MURDER -- March 2010
(also writing as Lucy Lawrence -- STUCK ON MURDER -- Sept 2009)
For more recipes and information visit: http://www.jennmckinlay.com/

Tuesday, July 28, 2009

Wine at the White House, and at My House

We all know that California produces some amazing wines. But did you know that Michigan wines have been served at the White House?

A number of years ago, my husband and I toured Tabor Hill Winery in Buchanan, Michigan with some good friends. We were certainly no wine connoisseurs, not even close—and trust me, we still aren’t. But what we learned on the visit changed our wine life, in a big way. Up until that point, I had always just always ordered Chardonnay because it was a white wine with a familiar name. Never mind that I really didn’t care for it—or the fact that Chardonnay gave me headaches.

In the Tabor Hill tasting room, we learned that their Classic Demi-Sec, a very inexpensive, semi-dry white, has been featured at White House functions under several administrations (and not just that of Michigander Gerald R. Ford).

After tasting the Demi-Sec, I understood why, and turned my back on Chardonnay for good. My husband and I took a case home, along with two bottles of Tabor Hill’s sweeter whites, a Reisling, and a Gewurtztraminer, as well as a couple of Demi-Reds and Cabernet Sauvignons. A newfound appreciation for wine was born.

Over the years, my husband and I have expanded our wine horizons, but we still turn to the Demi-Sec, and its partner, the Demi-Red when we’re throwing parties and need a supply of quality, inexpensive wines. In fact, I served these two American vintages at my book launch parties for the White House Chef series—and loved being able to tell my guests that they were sipping the same wines that presidents have enjoyed.

And don't forget to enter to win our weekly Mystery Lovers' Kitchen contest. The prize is a $25 gift certificate to the Williams-Sonoma kitchenware and gourmet food store. Just sign in to this blog and leave a comment or send an "Enter me!" e-mail with your first name and state to MysteryLoversKitchen@gmail.com We'll announce the winners right here starting next week.

Good luck!
Julie

Julie Hyzy’s White House Chef series features State of the Onion, Hail to the Chef, and Eggsecutive Orders (coming in January). All from Berkley Prime Crime. Sign up for Julie’s newsletter on her website at http://www.juliehyzy.com/

Monday, July 27, 2009

Cheese It!


I don’t know about you, but I heard that the term “Cheese it, the cops,” meant that thugs would stop everything they were doing and smile big so the cops wouldn’t know what they were up to, thus: “Say Cheese,” a common expression for the taking of pictures.

Now, as I research this well-known phrase, I learn that "Cheese it!” most probably meant “Cease it!”. [1811 Lexicon Balatron.: Cheese It. Be silent, be quiet, don’t do it. Cheese it, the coves are fly; be silent, the people understand our discourse. ]

However, not everyone agrees with that etymology. The phrase has also been linked to "stow it," which one researcher claims is “an intimation from a thief to his pal to desist from what he is about, on the occasion of some alarm,” derivating from putting cargo in ship’s storage and shutting the hatches.


Lastly, San Francisco word researcher Peter Tamony noted that cheese was eaten at the end of a meal, so “Cheese it!” could have meant “End it!” from culinary usage. [Since I’m writing The Cheese Shop Mysteries, I like this a lot!!!]

No matter what, when you say, “Cheese!” you smile.

And when you serve cheese, your guests smile.

My protagonist, Charlotte Bessette, a cheesemonger who will be starring in The Cheese Shop Mysteries, the first of which is coming out next July from Berkley Prime Crime, makes this her main priority when serving her customers at Fromagerie Bessette or sharing a meal with friends.

One of her favorite cheeses is Cypress Grove Humboldt Fog, a creamy goat cheese with a fine line of vegetable ash down the center. It crumbles beautifully on a summer salad. Here's Charlotte’s favorite salad recipe.


CHARLOTTE’S LIGHT SUMMER SALAD
(for two)

Mixed greens
4 artichoke hearts
6 baby tomatoes
6 slices cucumber
1/2 avocado, sliced thin
4 black olives sliced
1/4 cup garbanzo beans
1 baked chicken breast, skin removed, sliced thin

Dressing:

1 Tbs. olive oil
4 Tbs. balsamic vinegar
Salt and pepper to taste
1/4 cup Humboldt Fog cheese, crumbled

Enjoy!

To find out more about me and to explore the world of the upcoming Cheese Shop Mysteries, check out my website at http://www.averyaames.com/. There are recipes, tidbits, and other fun stuff. While you're at it, sign up for my newsletter.
And don't forget to enter to win our weekly Mystery Lovers' Kitchen contest. The prize is a $25 gift certificate to the Williams-Sonoma kitchenware and gourmet food store. Just sign in to this blog and leave a comment or send an "Enter me!" e-mail with your first name and state to MysteryLoversKitchen@gmail.com We'll announce the winners right here starting next week.
Best to all!

Welcome to Mystery Lovers' Kitchen

Today marks the official launch of Mystery Lovers' Kitchen, where mystery authors cook up crime . . . and recipes! I can hear you thinking -- but you've been posting for a week. That was our preview week, when we were ironing out the kinks. Fortunately, there weren't too many.

The authors of Mystery Lovers' Kitchen write cozy mysteries with food themes. From Julie Hyzy's White House Chef series, to Cleo Coyle's Coffeehouse Mysteries, and Krista Davis's Domestic Diva Mysteries, you're bound to find sleuths and recipes you'll love. In 2010, Avery Adams will launch the Cheese Shop Mystery series, Jenn McKinley's Cupcake Mysteries will debut, and Riley Adams will introduce the Memphis Barbecue Mysteries. In the meantime, we'll all be blogging here six days a week and bringing you guests on Sundays. Look for lots of recipes!

We're kicking things off by having a contest! Every week for the next six weeks, one lucky person will win a $25 gift certificate to Williams-Sonoma kitchenware and gourmet food store. To enter, just leave a comment!

If, for some reason, you are unable to leave a comment, send an "ENTER ME" e-mail with your first name and state to MysteryLoversKitchen@gmail.com. We'll announce the winners right here starting next week. So be sure to check back and see if you won!

We're having a lot of fun with this blog, and we hope you will enjoy it as much as we do!

Bon Appetit!

Saturday, July 25, 2009

Julia and Me

Before Paula Deen and Rachel Ray, before Martha, there was Julia Child. My mom loved her show, and I was the lucky beneficiary of many delicious dishes based on Julia Child's recipes. One recipe for chicken breast stood out as my favorite. It's very simple and I still make it today, although I've simplified it a bit. I've searched through Julia's cookbooks and can't find the exact recipe, but I think she may have called it Chicken Supreme.


Ingredients

three chicken breasts or one package of chicken tenders
two tablespoons butter or olive oil
half a lemon
two tablespoons chopped fresh parsley
salt

Julia's original recipe called for butter. Over time, with the push to eat less saturated fat, I started using olive oil instead. Until I made it both ways for this blog, I was happy with the olive oil version.
  1. (Optional) Julia's recipe began with folding waxed paper over the chicken breasts and pounding them so that they are uniform in thickness. This is a great idea and will yield more consistent results, but I'm generally too lazy and skip this step.
  2. Heat a saute pan (or similar) over medium/low heat. Add butter or olive oil. Place the chicken in the pan and squeeze the juice of half a lemon over the meat. Cover the pan. (Julia Child's version called for covering the meat with waxed paper and then putting a lid on the pan. I don't see much difference when I do that.)
  3. When the meat turns white around the edges (about three minutes for chicken tenders, five to six minutes for chicken breasts) turn the pieces over, add the parsley, cover and continue to heat.
  4. Cook just until the middle is no longer pink (about three to four minutes for tenders, about six to seven minutes for breasts, depending on the thickness).
  5. Salt to taste and plate the chicken. Drizzle the juices from the pan over the meat and serve.
Rice is a perfect match for this dish and I can't help thinking that Julie's White House Worthy Rice would be excellent with it! While it tastes delicious made with olive oil, I have to admit that it's better with butter. It's exactly the kind of dish that Sophie, the protagonist in my Domestic Diva Mysteries, would serve to her friends on short notice.

Friday, July 24, 2009

Cleo Coyle's Coffee Marinated Steak


Here’s a simple tip for making an economical cut of meat delicious—and a nice use for your leftover joe, too, because why not make use of every last drop?

Why I love this recipe: Grilling is a cooking process that too often overly dries thinner or less expensive cuts of meat. My coffee marinade imparts a wonderful, earthy character to the meat while also plumping it up, keeping it moist throughout the grilling process. Sure a super-fat T-bone steak would retain its moistness, but who can afford cuts like that for the whole family? As an experiment, I grilled my top round coffee-marinated steak alongside a rib eye steak treated only with dry rub. The top round was half the price, but tasted twice as good, thanks to its little bath in bean juice!

"Can't you just hear the sizzle?"


Ingredients: Steaks for grilling or broiling (I use top round)
Cold coffee
Salt & Pepper
Worcestershire sauce (optional)
Scallions or shallots (optional) 
Steak dry rub (optional)


Step 1: Purchase meat 
Go for an economical cut. (I use top round steak.) Pound the steak out with the spike side of a meat hammer. If you don’t have a meat hammer, then put your steak in a plastic bag and pound it with a regular hammer or the back of a ladle – and then prick it all over with a fork. This starts the tenderizing process. (It also gets all kinds of frustrations out. Who needs therapy when you can pound meat?)

Step 2: Cover with coffee
Place your steaks in a glass or plastic container and pour enough cold coffee over them to cover. You can use any kind of coffee. Just save the last dregs of your coffee pot for a few days (store in fridge) and you should have enough for the marinade.

Step 3: Add a little seasoning 
Add a tablespoon of salt (I like sea salt), a dash of pepper, and (optional) a couple of diced scallions or shallots along with a dash of Worcestershire sauce. Cover the container with plastic wrap and chill in the fridge for 1 to 3 hours. No longer.

Step 4: Remove and grill 
Pull the steaks out of the container and discard the liquid. Do not rinse. Just apply a favorite dry rub. There are many dry steak rubs available in your grocery aisle. (My favorite is Szeged brand Steak Rub in the cute little black metal can. Pictured right.) Cook your coffee-marinated steaks on a charcoal or gas grill, or broil the meat in the oven.

When my amateur sleuth, coffeehouse manager Clare Cosi, made a version of this dish in Through the Grinder, she cooked it in a cast iron skillet on the top of her stove. The stovetop is a great option, too, because it allows for pan drippings, which means...gravy! So I couldn’t resist having Clare whip up a delish side dish of Garlic Mashed Potatoes with Hearty Coffee Gravy. Yes. Coffee gravy! Lol! You can find those recipes in the back of Through the Grinder, too.

To find out more about my culinary mystery series, visit my Coffeehouse Mystery Web site, where you’ll find more recipes, as well. BTW yesterday (July 23rd) was the birthday of one of my favorite writers, Raymond Chandler. Did you know Chandler didn’t publish his first story until the age of 45 after he lost his executive position in an oil company during the Great Depression? Read more at my virtual coffeehouse home… http://coffeehousemystery.com/

Cheers, everyone, have a great weekend! ~Cleo

Thursday, July 23, 2009

Summery, Succulent Tomatoes

Riley Adams Food Blog Post pic It’s hard to beat summertime tomatoes.

Winter tomatoes are anemic shadows of the hearty summer variety. I won’t deign to buy them in winter, unless desperation drives me to it. Sometimes in winter, I’ll get Roma tomatoes at the store; their showy red pulls my attention from the bloodless tomatoes beside them.

In summer, it’s a different story. I step out my back door, pull tomatoes right off the vine, slice them and put them on bread. The drippier, the better.

For me, growing up in the South, summer and tomatoes are intertwined. I remember sweltering days when my mother drove us to the swimming pool for relief from the heat. We’d stop by the Farmer’s Market on the way and men fanned themselves with their straw hats as we picked through their tomatoes.

Neighbors would come by my parents’ house with a bag of tomatoes from their over-productive gardens and stay for a visit on the screened porch under the whirring ceiling fans.

Nowadays, you can still drive through any small, Southern town and see roadside carts filled with okra, snap beans, corn, and tomatoes.

One of my favorite summer treats is tomato pie. I’ll eat it hot from the oven or even eat it straight from the fridge for breakfast.

IMG_5328 Tomato Pie

4 tomatoes, peeled and sliced

10 fresh, chopped basil leaves

1/2 cup chopped green onion

1 frozen deep-dish pie crust (9 inches)

1 cup grated mozzarella

1 cup grated cheddar

1 cup mayonnaise

Salt and pepper to taste.

Bake pie crust according to package directions. For the pie, preheat your oven to 350 degrees. Put your peeled, sliced tomatoes in a colander and sprinkle with salt. Drain in colander for 10 minutes. Pat with paper towels to remove excess liquid (and prevent the pie from being soggy.)

Layer in the pie shell as follows: tomato slices, basil, green onion. Season to taste with salt and pepper. Mix together the grated cheeses and mayonnaise and spread the mixture on the top of the tomato/basil/green onions.

Bake for 30 minutes or until the pie is light brown. Cool.

Enjoy!

The Memphis Barbeque Series, by Riley Adams (Elizabeth Spann Craig) will be released May 2010 from Berkley Prime Crime.

I hope you’ll also visit me at my other blog:

Mystery Writing is Murder

Wednesday, July 22, 2009

The History of Cupcakes

When I started writing the Cupcake
Bakery Mystery Series,
I happily
immersed myself in all
things cupcake.
In fact, I’ve been
haunting my local cupcake bakeries,
Lulu’s and Sprinkles, all in the
name of research and inspiration
of course, and I’ve playing with my
own recipes until I get them just right.
It’s been just brutal, as I’m sure you
can tell from the photo below.


These are my very own
Tinkerbell Cupcakes (a lemon
cake with a raspberry
buttercream icing)! You can
find the recipe on my website
which is listed below.

While writing, one of the things
I became curious about was the
history of the cupcake. Where did these little beauties come from?
Who was the clever cook who thought them up?

There are a variety of answers. The cupcake, as it has come to be known,
was originally called a “number cake” as a mnemonic device to remember
the ingredients: One cup of butter, two cups of sugar, three cups of flour,
four eggs, one cup of milk, and one spoonful of soda. These cakes were cooked
in actual cups, including teacups, allowing for more even baking than large
cakes in the hearth ovens of old. Another source for the name cupcake comes
from the fact that this was the first time ingredients were measured by the
cup instead of being weighed, which saved enormous amounts of time in the
kitchen.
By the turn of the 20th century, gem pans, like the cast iron one pictured
here, became readily available. Designed for breads and muffins called “gems”
these pans were useful for cupcakes and developed over time much like the
cupcake itself into the cupcake tins we know today.


Because I find ingredients so

interesting, I’ve included a few

historic cupcake recipes that I


(a fascinating site)!


[1796]
"A light Cake to bake in small cups. Half a pound sugar, half a pound butter,
rubbed into two pounds flour, one glass wine, one do. [glass] Rosewater, two
do.[glass]Emptins,
a nutmeg, cinnamon and currants."
---American
Cookery, Amelia Simmons, 2nd edition (p. 48)

[1828]
"Cup cake.
5 eggs.
Two large tea-cups full of molasses.
The same of brown sugar, rolled fine.
The same of fresh butter.
One cup of rich milk.
Five cups of flour, sifted.
Half a cup of powdered allspice and cloves.
Half a cup of ginger.

Cut up the butter in the milk, and warm them slightly. Warm also the molasses, and stir it into the milk and butter: then stir in, gradually, the sugar, and set it away to get cool. Beat the eggs very light, and stir them into the mixture alternately with the flour. Add the ginger and other spice, and stir the whole very hard. Butter small tins, nearly fill them with the mixture, and bake the cakes in a moderate oven."
---Seventy-Five Receipts for Pastry, Cakes, and Sweetmeats, By a Lady of Philadelphia [Eliza Leslie](p. 61)

[1833]
"Cup cake. Cup cake is about as good as pound cake, and is cheaper. One cup of butter, two cups of sugar, three cups of flour, and four eggs, well beat together, and baked in pans or cups. Bake twenty minutes, and no more."
---American Frugal Housewife, Mrs. Child (p. 71)


There’s my short history on the cupcake. Join me next Wednesday when I talk about my
misadventures while trying to bake a mug cake in the microwave!

Jenn McKinlay
SPRNKLE WITH MURDER -- Berkley Prime Crime -- March 2010
For more recipes and information visit:
http://www.jennmckinlay.com/

Tuesday, July 21, 2009

White House Worthy Rice


Like Avery, I attempt to recreate restaurant treasures at home when I discover something particularly special. Not long ago, I took my daughter and her boyfriend to lunch at Bandera, a club-like restaurant in Chicago that can be easily missed if you don’t know it’s there. On the second floor of its north Michigan Avenue location, it is accessed via escalator immediately inside the street-level doors, and boasts great views of the bustling street below.

The menu had changed since I’d last been there. Lots of new and exciting offerings. But that day I decided to have the restaurant’s specialty—broasted chicken. Not a particularly exciting choice, but it smelled divine. The waitress informed me that they were testing out a new rice, and that the side dish on the menu was no longer available. I’m not usually much of a rice girl, but because my chicken choice was safe, I decided to be adventurous with my side. “Sounds great,” I told her. Am I glad I did. The chicken was fabulous, but the rice was superb.

I couldn’t wait to try making this at home, but I had no idea where to start. Then I remembered something from my White House research. One of the early menus prepared by our current White House chef, Cristeta Comerford (the real chef, not my fictional Ollie), included Basmati rice. At the time I had no idea what that was, but the name stuck with me.

Grown in India and Pakistan, Basmati’s name translates to “fragrant one,” or “the soft rice.” I chose baby Basmati which I found at my local grocery store, and went to work, trying my best to recreate the combination of flavors I had so thoroughly enjoyed. I'd like to think this side dish is similar to the one served in the White House.

Like Avery and her artichokes (yum!), I think I’ve gotten pretty close.

(But the White House has much fancier serving bowls!)

Cilantro Rice

2 cups water
1 T olive oil
1 cup baby basmati rice

1 pinch cumin seeds, crushed
1 t parsley
1 T chives, chopped
1 ½ T fresh cilantro, chopped
1 egg
2 tsp salt
3 T butter

Bring water and olive oil to a boil. Add rice, cover, and reduce heat to low. Set timer for 8 minutes. While rice is simmering, combine cumin, parsley, chives, and cilantro in a small bowl. In a separate small bowl, beat the egg, like you’re making scrambled eggs. When the timer goes off, stir the egg into the rice, making sure it’s well combined. Add herb mixture, stir well, and cover. Set timer for 5 minutes. When time’s up add salt and butter, stir, and cook for an additional minute or two. Transfer to bowl and serve immediately.

Serves 4

Thanks! Hope you enjoy!

Julie Hyzy’s White House Chef series features State of the Onion, Hail to the Chef, and Eggsecutive Orders (coming in January). All from Berkley Prime Crime. Check out Julie’s website at http://www.juliehyzy.com/

Monday, July 20, 2009

Say Cheese!


Have you ever been in a restaurant, eaten something so delicious you believed you’d faint, and then thought, “I could make that”???

I went to a fabulous restaurant in New York City called La Masseria on 48th. On the menu that day was an appetizer that made my mouth water: artichoke hearts baked with Taleggio. Taleggio is an Italian washed-rind, cow’s milk cheese. A washed-rind cheese is washed or “rubbed” by hand with a moist cloth soaked in a brine solution of rock salt and water to inhibit growth of mold and encourage the growth of bacteria. Taleggio has a strong aroma but a tangy, slightly salty flavor. It melts like a dream. Ripe Taleggio will be soft enough to cut with a dull butter knife. The reddish-brown crust should be uncracked.

Later that week, I tried to copy the recipe, and I have to say I got pretty darned close. I’m no chef. I’m an author and I write The Cheese Shop Mysteries that will be coming out from Berkley Prime Crime next July, but I’m always on the alert for a new cheese-based dish.

I’d like to share my version of the appetizer. Enjoy and remember when you’re done eating, remember to smile and “Say Cheese!”

ARTICHOKES AND TALEGGIO


Makes: 1 PORTION

Ingredients:

1 tsp. olive oil
3 canned artichokes (in water), or 3 fresh small (2”) artichokes cooked tender, and halved
2 mushrooms, sliced
1/2 clove garlic, sliced
2 oz. white wine
2 oz. Taleggio, diced
Pinch salt
Pinch nutmeg


Directions:

Saute olive oil, artichokes halved, mushrooms sliced, garlic sliced, white wine.
Put into casserole pan.
Top with Taleggio, diced, pinch salt, and pinch nutmeg

Bake 400 degrees, 6 minutes until cheese is bubbling.

Serve hot.
The Cheese Shop Mysteries, by Avery Aames, are coming out in July 2010 from Berkley Prime Crime.

Learn more about Avery at her website -- http://www.averyaames.com/ and sign up for her newsletter, a monthly event with tidbits, mini-histories of cheese, and future contests.